# Activation and Licence Access
Choose an activation path, connect a subscription, manage terminals, and understand licence limits.
# Choose the Correct Muhasib Activation Path
How to Choose the Correct Muhasib Activation Path in Muhasib ERP
Overview
This guide will help you select the activation path that matches the subscription and terminal you are authorized to use.
Muhasib advances to the next allowed lifecycle state or preserves the current state for safe diagnosis; the verification section identifies the expected result.
Who can do this
You need access to Use requires the rights and business authority described by the workflow. Database, licence, user, company, or system changes require the responsible administrator.
Before you start
Confirm who owns the subscription, whether this computer is the primary or an more terminal, and whether the database belongs to a new or existing Muhasib workspace.
Before saving, check that the correct company is open and that you have permission to complete this task.
Where to find it
Follow the launch, wizard, login, company-selection, Back Office, or power path described in the procedure; the available starting screen depends on current installation state.
Choose the Correct Muhasib Activation Path
MUHASIB ACTIVATION
↓
Identify Current State
↓
|
New Setup
↓
Wizard
|
Existing Setup
↓
Login / Company
|
Re-activation
↓
Licence Path
|
↓
Perform Activation
↓
Verify Licence
Step 1: Identify the current lifecycle state and intended outcome
Step 2: Follow the decision or safety guidance already described in this article
CURRENT STATE
↓
What are you trying
to achieve?
↓
|
New
Activation
↓
Path A
|
Existing
Database
↓
Path B
|
Other
Scenario
↓
Path C
|
Step 4: Verify the resulting screen, identity, and state before continuing
Check your work
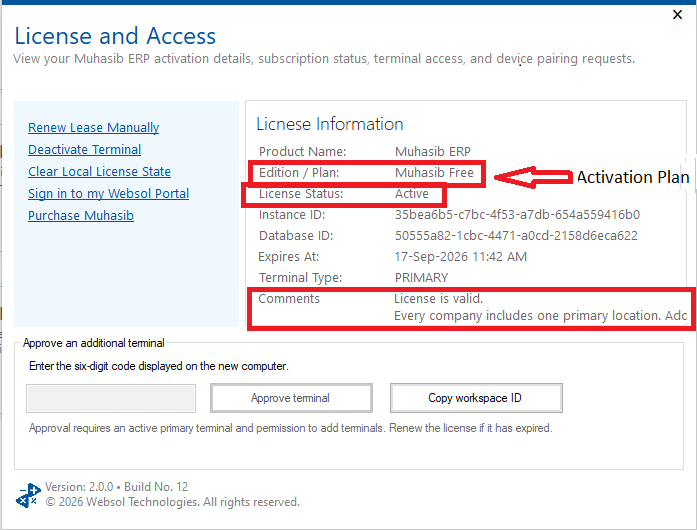
After activation, Licence Information should show the expected plan/status, database identity, instance identity, and terminal type. Continue only if they match the intended deployment.
Take a moment to check your work before closing the window. This small check can save time later.
If something goes wrong
If the expected result is not shown, stop repeated attempts, check the active database/workspace/user/licence context, preserve the exact message, and follow the related recovery article.
Related guides
What to do next
# Activate Muhasib Free
How to Activate Muhasib Free in Muhasib ERP
Overview
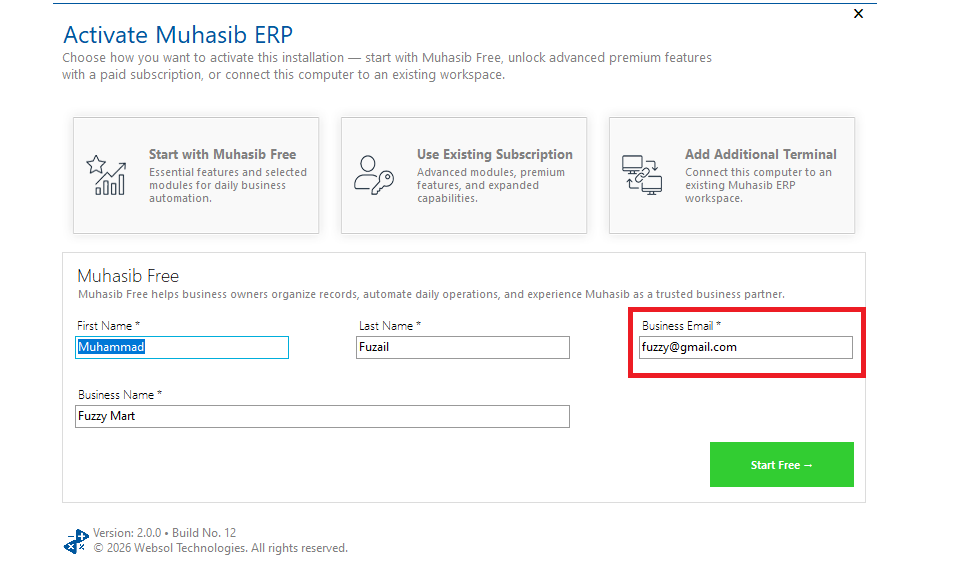
This guide will help you register an allowed business and activate the current Muhasib workspace on the Free plan.
Muhasib associates the local instance and database identity with the resulting licence state. A new database normally proceeds to company and administrator onboarding; an existing set up database may proceed toward sign-in.
Who can do this
You need access to Use requires the rights and business authority described by the workflow. Database, licence, user, company, or system changes require the responsible administrator.
Before you start
Connect the intended Muhasib database and make sure internet access to the authorized activation service. Use business contact information that you are authorized to submit.
Before saving, check that the correct company is open and that you have permission to complete this task.
Where to find it
Follow the launch, wizard, login, company-selection, Back Office, or power path described in the procedure; the available starting screen depends on current installation state.
Activate Muhasib Free
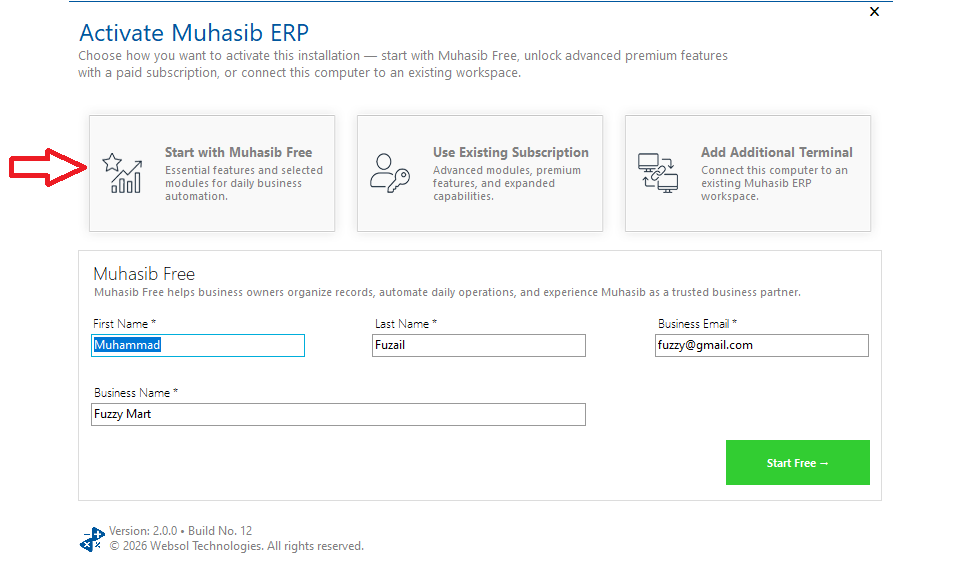
Step 1: In the Activation wizard, choose Start Free
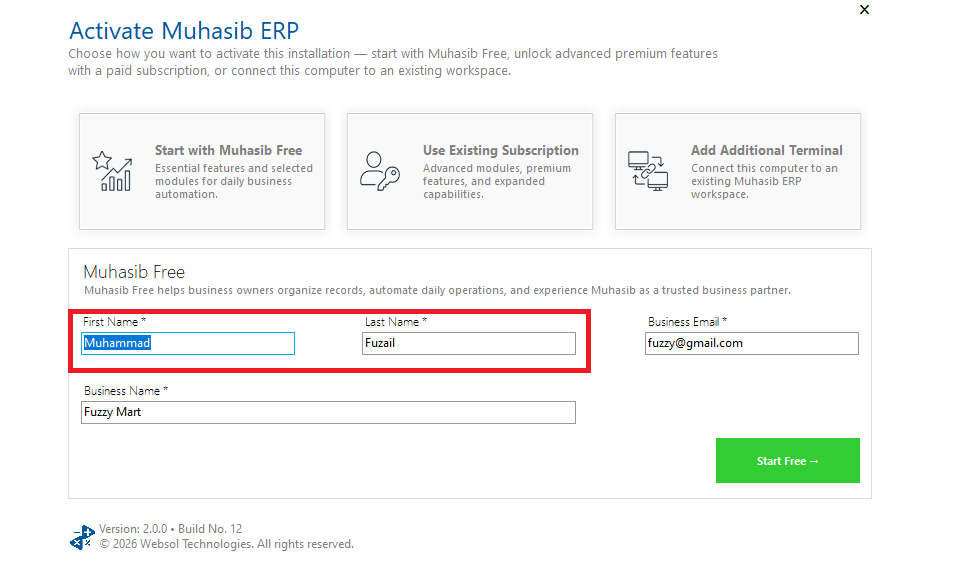
Step 2: Enter the contact's first name and last name
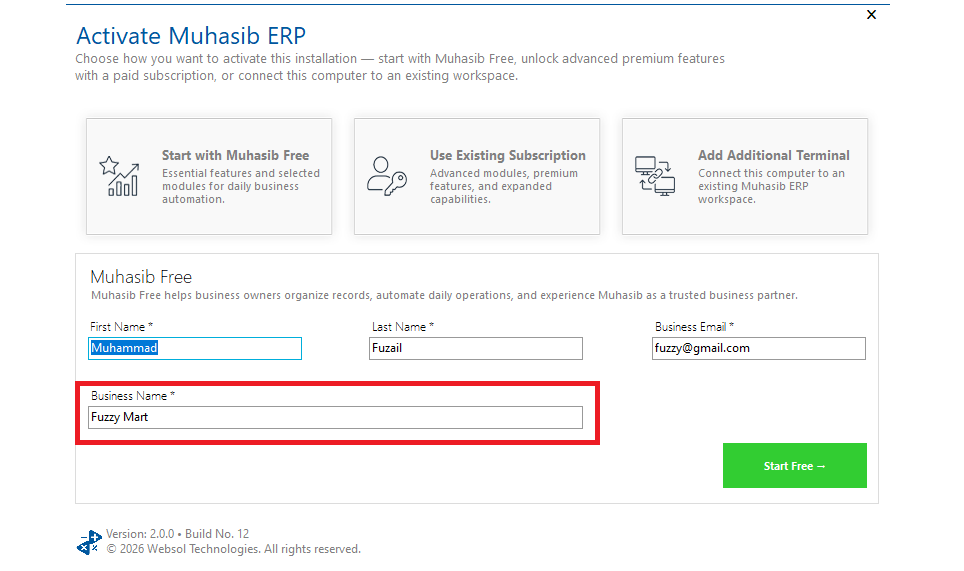
Step 3: Enter the business name
Step 4: Enter the authorized business email address
Step 5: Submit the activation request
Step 6: Wait for Muhasib has been activated successfully before closing the
Wait for Muhasib has been activated successfully before closing the wizard.
Check your work
Open Licence Information and confirm that status, plan, database identity, instance identity, and terminal type match the intended workspace.
Take a moment to check your work before closing the window. This small check can save time later.
If something goes wrong
- Complete every required identity/business field.
- If activation is refused, do not repeatedly create identities or databases; preserve the service message.
- If the organization already owns a subscription, use that subscription rather than creating an unrelated Free workspace.
Related guides
What to do next
# Activate an Existing Muhasib Subscription
### How to Activate an Existing Muhasib Subscription in Muhasib ERP
### Overview
This guide will help you sign in to the Websol Portal, select an active Muhasib subscription, and activate this computer as its primary terminal.
The activation service binds the selected subscription to the workspace/database and identifies this computer as primary. Selecting the wrong subscription can attach the instance to the wrong entitlement.
### Who can do this
You need access to Use requires the rights and business authority described by the workflow. Database, licence, user, company, or system changes require the responsible administrator.
### Before you start
Connect the correct workspace database. Have the authorized Websol Portal email and password, and confirm this computer is intended to become the primary terminal.
Before saving, check that the correct company is open and that you have permission to complete this task.
### Where to find it
Follow the launch, wizard, login, company-selection, Back Office, or power path described in the procedure; the available starting screen depends on current installation state.
### Activate an Existing Muhasib Subscription
#### Step 1: Open the existing-subscription section of the Activation wizard
#### Step 2: Enter the Websol Portal email and password
#### Step 3: Choose the portal sign-in action
#### Step 4: After subscriptions load, review the available active subscriptions
#### Step 5: Select the subscription assigned to this business and database
#### Step 6: Choose the action to activate the selected subscription
#### Step 7: Wait for confirmation that this computer has been activated as
Wait for confirmation that this computer has been activated as the primary terminal.
### Check your work
Review Licence Information and confirm the expected plan, status, expiry, database identity, instance identity, and primary-terminal type.
Take a moment to check your work before closing the window. This small check can save time later.
### If something goes wrong
- If no subscription appears, check the portal account owns an active Muhasib subscription.
- If the selected record lacks a valid subscription ID, sign in again and reload subscriptions.
- If another computer is already primary, use the controlled transfer path only with the subscription owner's approval.
### Related guides
- [Choose the Correct Muhasib Activation Path](https://docs.muhasiberp.com/link/556)
- [Transfer Primary Muhasib Access to This Computer](https://docs.muhasiberp.com/link/559)
- [Activate an Additional Muhasib Terminal](https://docs.muhasiberp.com/link/560)
- [Review and Maintain Muhasib Licence Access](https://docs.muhasiberp.com/link/561)
### What to do next
[**Choose the Correct Muhasib Activation Path**](https://docs.muhasiberp.com/link/556).
# Transfer Primary Muhasib Access to This Computer
### How to Transfer Primary Muhasib Access to This Computer in Muhasib ERP
### Overview
This guide will help you move the subscription's primary-terminal assignment to this computer with a clear understanding of the effect on the previous primary.
The activation service changes which computer represents the primary terminal. The previous primary may lose primary functionality and may require an more-terminal workflow or another authorized recovery action.
### Who can do this
You need access to Authorization from the subscription owner and Websol Portal access for the active subscription.
### Before you start
Confirm the old and new computers, the exact workspace database, and how the old primary will be recovered or re-paired if required. Make sure no critical work is in progress on either terminal.
Before saving, check that the correct company is open and that you have permission to complete this task.
### Where to find it
Follow the launch, wizard, login, company-selection, Back Office, or power path described in the procedure; the available starting screen depends on current installation state.
### Transfer Primary Muhasib Access to This Computer
#### Step 1: Open the Activation wizard on the new primary computer
#### Step 2: Sign in to the authorized Websol Portal account
#### Step 3: Select the correct active Muhasib subscription
#### Step 4: Choose Transfer Primary
#### Step 5: Read the warning that the previous primary terminal may stop
Read the warning that the previous primary terminal may stop working as primary.
#### Step 6: Confirm only when the subscription, database, and new computer are
Confirm only when the subscription, database, and new computer are correct.
#### Step 7: Wait for the transfer result before closing Muhasib on either terminal
### Check your work
Confirm the new computer's terminal type in Licence Information, then test the old computer's resulting status without attempting another transfer.
Take a moment to check your work before closing the window. This small check can save time later.
### If something goes wrong
- If the transfer fails, preserve the exact service message and current state of both terminals.
- Do not clear local licence state on both computers as a troubleshooting shortcut.
- Contact support if either terminal's identity no longer matches the intended workspace.
### Related guides
- [Activate an Existing Muhasib Subscription](https://docs.muhasiberp.com/link/558)
- [Activate an Additional Muhasib Terminal](https://docs.muhasiberp.com/link/560)
- [Review and Maintain Muhasib Licence Access](https://docs.muhasiberp.com/link/561)
- [Request Muhasib Support](https://docs.muhasiberp.com/link/573)
### What to do next
[**Activate an Existing Muhasib Subscription**](https://docs.muhasiberp.com/link/558).
# Activate an Additional Muhasib Terminal
### How to Activate an Additional Muhasib Terminal in Muhasib ERP
### Overview
This guide will help you pair an authorized more computer with an existing Muhasib workspace without transferring primary access.
The more computer receives a licence-terminal relationship to the existing workspace. It does not become the primary unless a separate primary-transfer action is performed.
### Who can do this
You need access to Use requires the rights and business authority described by the workflow. Database, licence, user, company, or system changes require the responsible administrator.
### Before you start
The workspace must already have an active primary terminal. Prepare the more computer with the correct database connection and get access to the primary-side pairing workflow.
Before saving, check that the correct company is open and that you have permission to complete this task.
### Where to find it
Follow the launch, wizard, login, company-selection, Back Office, or power path described in the procedure; the available starting screen depends on current installation state.
### Activate an Additional Muhasib Terminal
#### Step 1: On the additional computer, choose the additional-terminal option in the
On the more computer, choose the more-terminal option in the Activation wizard.
#### Step 2: Confirm that the displayed workspace or instance identity belongs to
Make sure the shown workspace or instance identity belongs to the intended database.
#### Step 3: Begin the pairing request
#### Step 4: On the authorized primary side, review and approve the request
On the authorized primary side, review and approve the request according to the shown workflow.
#### Step 5: Enter or exchange the generated pairing code/token only through the
Enter or exchange the generated pairing code/token only through the intended secure channel.
#### Step 6: Complete pairing on the additional computer before the credential expires
Complete pairing on the more computer before the credential expires.
#### Step 7: Restart or continue when instructed
### Check your work
Review Licence Information on both computers. Make sure the original remains primary, the new computer is more, and both reference the intended database/workspace.
Take a moment to check your work before closing the window. This small check can save time later.
### If something goes wrong
- Generate a new pairing request if the code/token expires.
- Reject requests whose device or workspace identity is unfamiliar.
- If plan capacity is reached, resolve entitlement capacity rather than transferring primary access accidentally.
### Related guides
- [Choose the Correct Muhasib Activation Path](https://docs.muhasiberp.com/link/556)
- [Activate an Existing Muhasib Subscription](https://docs.muhasiberp.com/link/558)
- [Transfer Primary Muhasib Access to This Computer](https://docs.muhasiberp.com/link/559)
- [Understand Muhasib Plan Limits and Restricted Access](https://docs.muhasiberp.com/link/562)
- [Review and Maintain Muhasib Licence Access](https://docs.muhasiberp.com/link/561)
### What to do next
[**Choose the Correct Muhasib Activation Path**](https://docs.muhasiberp.com/link/556).
# Review and Maintain Muhasib Licence Access
### How to Review and Maintain Muhasib Licence Access in Muhasib ERP
### Overview
This guide will help you identify the licence assigned to this Muhasib installation and choose a safe maintenance action.
Renewal requests refreshed licence information. Deactivation and clearing local licence state require confirmation and then close Muhasib. Clearing local state is not the same as cancelling a subscription or safely transferring primary access.
### Who can do this
You need access to Access to licence information and authorization from the subscription owner for renewal, deactivation, or clearing local state.
### Before you start
Finish active transactions and record the selected company and database. Deactivation or clearing local state exits Muhasib and can prevent access until activation is restored.
Before saving, check that the correct company is open and that you have permission to complete this task.
### Where to find it
Follow the launch, wizard, login, company-selection, Back Office, or power path described in the procedure; the available starting screen depends on current installation state.
### Review and Maintain Muhasib Licence Access
#### Step 1: Open Licence Information from the Back Office licence/help area
#### Step 2: Review the displayed plan, status, expiry, database ID, instance ID,
Review the shown plan, status, expiry, database ID, instance ID, and terminal type.
#### Step 3: Confirm that the database and instance belong to the intended workspace
Make sure the database and instance belong to the intended workspace.
#### Step 4: Choose only the action needed
Choose only the action needed:
- renew or refresh when entitlement should remain on this computer;
- open the portal or purchase route to manage the subscription;
- deactivate when this terminal should be released through the supported service;
- clear local state only as an authorized recovery step.
#### Step 5: Read every confirmation before proceeding
### Check your work
For a refresh or renewal, reopen Licence Information and confirm the status and expiry. For deactivation or cleared state, relaunch and confirm the expected activation screen before attempting recovery.
Take a moment to check your work before closing the window. This small check can save time later.
### If something goes wrong
- If database or instance identity is unexpected, stop before changing licence state.
- If renewal succeeds in the portal but the client remains stale, use the supported refresh/restart path.
- Preserve service messages when contacting support; do not send tokens or passwords.
### Related guides
- [Choose the Correct Muhasib Activation Path](https://docs.muhasiberp.com/link/556)
- [Transfer Primary Muhasib Access to This Computer](https://docs.muhasiberp.com/link/559)
- [Activate an Additional Muhasib Terminal](https://docs.muhasiberp.com/link/560)
- [Understand Muhasib Plan Limits and Restricted Access](https://docs.muhasiberp.com/link/562)
- [Request Muhasib Support](https://docs.muhasiberp.com/link/573)
### What to do next
[**Choose the Correct Muhasib Activation Path**](https://docs.muhasiberp.com/link/556).
# Understand Muhasib Plan Limits and Restricted Access
### Understand Muhasib Plan Limits and Restricted Access
### Overview
This guide will help you distinguish a subscription feature restriction from a capacity warning or block and choose the correct remedy.
Muhasib advances to the next allowed lifecycle state or preserves the current state for safe diagnosis; the verification section identifies the expected result.
### Who can do this
You need access to Use requires the rights and business authority described by the workflow. Database, licence, user, company, or system changes require the responsible administrator.
### Before you start
Confirm the intended workstation, database, company/workspace, user or subscription context, and preserve any in-progress work before proceeding.
Before saving, check that the correct company is open and that you have permission to complete this task.
### Where to find it
Follow the launch, wizard, login, company-selection, Back Office, or power path described in the procedure; the available starting screen depends on current installation state.
### Understand Muhasib Plan Limits and Restricted Access
#### Step 1: Record the exact warning or blocked-action message
#### Step 2: Review Licence Information for plan, status, expiry, and terminal type
#### Step 3: Determine whether the entire module is absent or only one
Determine whether the entire module is absent or only one action is unavailable.
#### Step 4: Ask an administrator to compare the user's role permission without
Ask an administrator to compare the user's role permission without changing it merely to test access.
#### Step 5: If the message names a capacity, count only active records
If the message names a capacity, count only active records in the scope defined by the plan.
#### Step 6: Use the portal or subscription owner to resolve entitlement or capacity
#### Step 7: Restart or sign in again only when instructed so refreshed
Restart or sign in again only when instructed so refreshed rights and features can load.
### Check your work
The intended module/action becomes available to an authorized user, and Licence Information shows the expected active entitlement. Do not check by bypassing role controls.
Take a moment to check your work before closing the window. This small check can save time later.
### If something goes wrong
- A missing button can result from either plan or role filtering.
- Company, location, terminal, user, item, customer, and supplier capacities may have different scopes.
- Never delete business records solely to reduce a licence count without dependency review and approval.
### Related guides
- [Review and Maintain Muhasib Licence Access](https://docs.muhasiberp.com/link/561)
- [Understand Why a Module or Action Is Unavailable](https://docs.muhasiberp.com/link/569)
- [Grant and Revoke Muhasib Permissions](https://docs.muhasiberp.com/link/187)
- [Request Muhasib Support](https://docs.muhasiberp.com/link/573)
### What to do next
[**Review and Maintain Muhasib Licence Access**](https://docs.muhasiberp.com/link/561).