# Start Here
Muhasib ERP outcome-based user guide.
# About Muhasib ERP and This Guide
Learn what Muhasib ERP does, how this guide is arranged, and where to begin.
# Installation and Requirements
Prepare a Windows computer, database connection, network, and devices before running Muhasib ERP.
# Prepare a Computer to Run Muhasib ERP
How to Prepare a Computer to Run Muhasib ERP in Muhasib ERP
Overview
This guide will help you have a Windows computer, SQL Server connection, and deployment information ready before launching Muhasib ERP.
The first launch may ask for database settings, activation, company onboarding, or sign-in depending on the workstation and database state. Startup can also initialize settings or apply database updates, so do not test an unfamiliar build against the only copy of production data.
Who can do this
You need access to Windows and SQL Server installation or settings may require a local administrator and a database administrator. Muhasib permissions are not required before first launch.
Before you start
Get the approved Muhasib installer or executable, the target company deployment model, and one of these database options:
- an existing Muhasib database with its SQL Server name and approved authentication method; or
- authorization and SQL Server rights to create a new Muhasib database.
For subscription activation, have access to the appropriate Websol Portal account. An more terminal also requires information from the primary workspace's pairing workflow.
Before saving, check that the correct company is open and that you have permission to complete this task.
Where to find it
Preparation happens outside and before Muhasib; use Windows, SQL Server administration, and the approved deployment package, then launch the Muhasib executable.
Prepare a Computer to Run Muhasib ERP
System Requirements
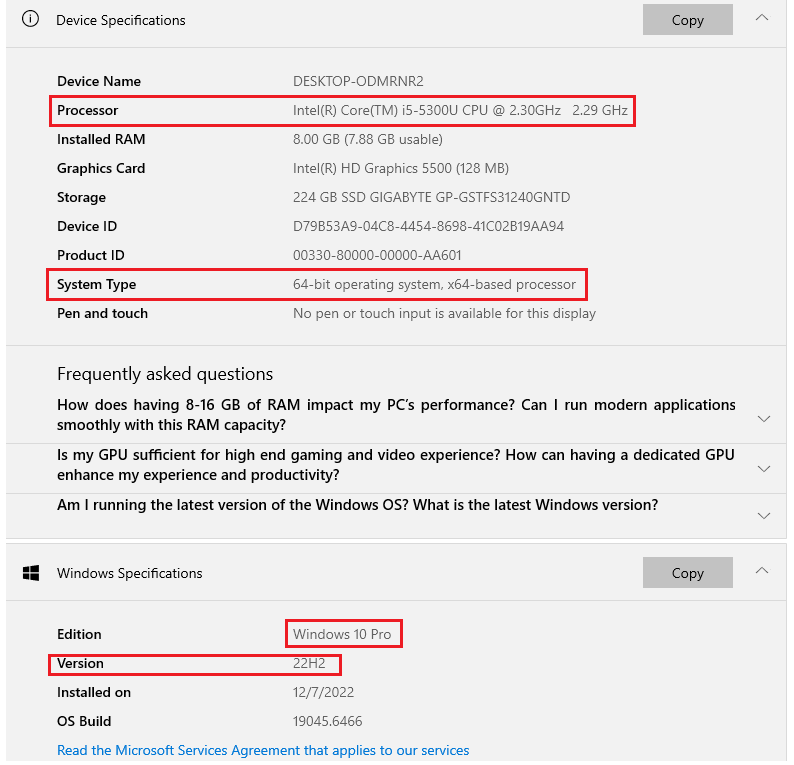
The following requirements apply to the Windows desktop edition of Muhasib ERP v1.0.0.
Workstation Requirements
| Component |
Minimum Requirements |
Recommended Requirements |
| Operating System |
Windows 10, 64-bit |
Windows 11 Pro, 64-bit |
| Processor |
Dual-core, 2.0 GHz |
Intel Core i3/i5 or AMD Ryzen 3/5 |
| Memory |
4 GB RAM |
8 GB RAM or more |
| Storage |
10 GB available space |
20 GB or more on SSD |
| Display |
1366 × 768 resolution |
1920 × 1080 resolution |
| Network |
100 Mbps LAN or stable Wi-Fi |
Gigabit wired LAN |
| Internet |
Required for activation and online services |
Stable broadband connection |
| Architecture |
x64 Windows computer |
x64 Windows computer |
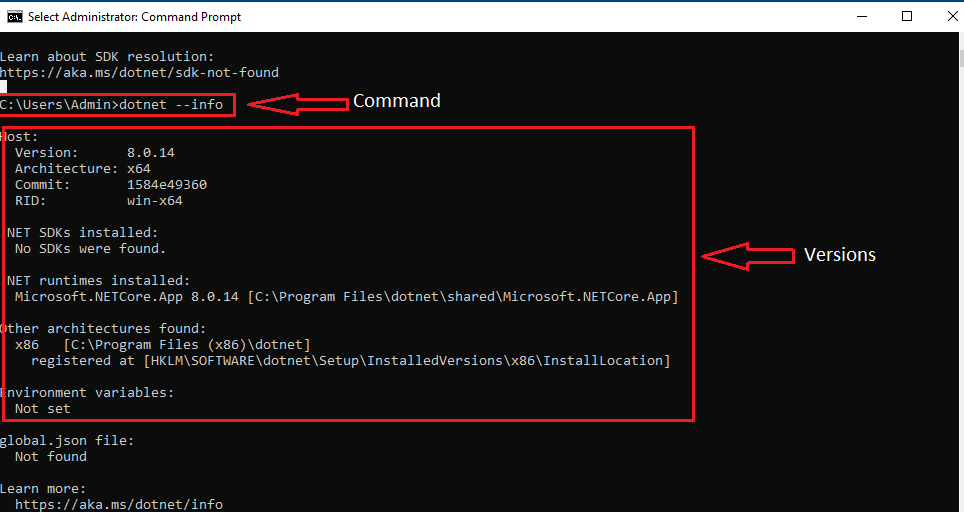
Muhasib ERP uses Microsoft .NET Framework 4.8. Windows 11 includes a compatible .NET Framework version, while supported Windows versions can install .NET Framework 4.8 separately.
Database Server Requirements
For multi-terminal environments, a dedicated computer should host the Muhasib ERP database.
| Component |
Small Deployment |
Recommended Deployment |
| Users/Terminals |
Up to 5 terminals |
More than 5 terminals |
| Operating System |
Windows 10/11 Pro, 64-bit |
Windows Server 2022 or later |
| Processor |
4-core processor |
Intel Core i5/i7, Xeon, or AMD equivalent |
| Memory |
8 GB RAM |
16 GB RAM or more |
| Storage |
50 GB SSD |
100 GB or more on NVMe/SSD |
| Database |
SQL Server Express
Download Microsoft SQL Server 2016 |
SQL Server Standard for larger installations
Download Microsoft SQL Server 2016 |
| Network |
100 Mbps LAN |
Gigabit wired LAN |
| Backup Storage |
External or secondary drive |
Dedicated local and off-site backup storage |
Microsoft SQL Server requires additional storage for installation files, database files, transaction logs, temporary files, and backups. Reserve at least 6 GB of available space for the SQL Server installation itself, in addition to the storage required for Muhasib ERP databases and backups.
Recommended Database Platform
- Microsoft SQL Server 2016 Express for small and medium installations.
- Microsoft SQL Server Standard for high transaction volumes, larger databases, or larger numbers of concurrent users.
- SQL Server Management Studio for database administration and maintenance.
- Automated daily database backups.
Required Software Components
The Muhasib ERP installer or implementation package should install, provide, or verify the following components:
- Microsoft .NET Framework 4.8 or a compatible later version.
- Microsoft SQL Server Database Engine.
- Microsoft Entity Framework runtime components.
- Microsoft ReportViewer runtime.
- Required Muhasib ERP and Websol libraries.
- Appropriate Windows printer drivers.
- Latest applicable Windows security and reliability updates.
Administrator access may be required during application installation, database configuration, firewall configuration, Windows service setup, and printer installation.
Network Requirements
For a multi-terminal deployment:
- All Muhasib ERP terminals must be connected to the same reliable local network.
- A wired Ethernet connection is recommended for the database server and primary business terminals.
- The database server should use a fixed IP address or a consistently resolvable computer name.
- SQL Server TCP/IP connectivity must be enabled.
- The configured SQL Server port must be allowed through Windows Firewall.
- Network discovery and communication between the server and terminals must be available.
- Wireless connections should not be used for the primary database server.
Internet access is required for software activation, periodic licence validation, updates, tax integrations, SMS services, and other online features.
Core local operations may continue temporarily during an internet interruption, subject to the applicable licence, offline-use limits, enabled services, and system configuration.
Optional Hardware
Depending on the enabled Muhasib ERP modules and business requirements, the following devices may be used:
- 58 mm or 80 mm thermal receipt printer.
- A4 laser or inkjet printer.
- USB barcode scanner.
- Barcode or product label printer.
- Cash drawer connected through the receipt printer.
- Customer-facing display.
- Touchscreen terminal.
- Electronic weighing scale, where supported.
- UPS for the database server and client terminals.
- External drive or network storage for backups.
All peripheral devices must have compatible Windows drivers and should be tested before production deployment.
Microsoft Excel Requirement
Microsoft Excel 2013 or later is required only for reports and functions that export information directly through Microsoft Excel.
Normal Muhasib ERP operations and standard report viewing do not require Microsoft Office.
Standalone Installation
For a single-computer installation, the Muhasib ERP application and SQL Server database may be installed on the same computer.
Recommended Standalone Configuration
- Windows 11 Pro, 64-bit.
- Intel Core i3 or AMD Ryzen 3 processor or better.
- 8 GB RAM.
- 256 GB SSD.
- At least 20 GB available storage.
- Stable internet connection.
- UPS or reliable power backup.
Step 1: Confirm that the computer runs an officially supported version of
Make sure the computer runs an officially supported version of Windows.
Step 2: Confirm that the supplied Muhasib release and required .NET runtime
Make sure the supplied Muhasib release and required.NET system are installed.
Step 3: Verify network access to the SQL Server that hosts the Muhasib database
Step 4: Obtain either Windows-integrated database access or a dedicated SQL login.
Get either Windows-integrated database access or a dedicated SQL login. Do not share credentials in screenshots or support messages.
Step 5: Confirm whether this computer will be the primary terminal or
Confirm whether this computer will be the primary terminal or an more terminal.
Step 6: Identify the company, location, Windows printer, and Muhasib user role
Identify the company, location, Windows printer, and Muhasib user role intended for this computer.
Step 7: If you will print receipts, invoices, or labels, install and
If you will print receipts, invoices, or labels, install and test the Windows printer first.
Step 8: Ensure a current database backup exists before connecting an older
Make sure a current database backup exists before connecting an older database to a newer Muhasib build.
Step 9: For a shared computer, decide whether remembered sign-in credentials are
For a shared computer, decide whether remembered sign-in credentials are permitted by your organization's security policy.
Check your work
You should be able to identify the executable, database server, authentication method, activation path, intended terminal type, and responsible administrator without guessing.
Take a moment to check your work before closing the window. This small check can save time later.
If something goes wrong
- If the SQL Server or credentials are unknown, stop and contact the database administrator.
- If this is an upgrade, confirm the supported upgrade path and backup before launching.
- If activation ownership is unclear, do not transfer primary access; contact the subscription owner.
Related guides
What to do next
# Launch and Database Connection
Start Muhasib ERP, connect or create its database, and resolve common startup interruptions.
# Launch Muhasib ERP
How to Launch Muhasib ERP in Muhasib ERP
Overview
This guide will help you start Muhasib ERP and recognize whether it is proceeding normally or needs database, activation, onboarding, or recovery action.
Startup can create missing default settings and may initialize or migrate database data. A successful set up launch reaches sign-in and then the authorized company workspace.
Who can do this
You need access to Permission to run the installed application. Database or activation administration may be required if first-run setup appears.
Before you start
Prepare the computer and make sure the set up SQL Server is reachable. Back up the database before the first launch of a newer application build.
Before saving, check that the correct company is open and that you have permission to complete this task.
Where to find it
Follow the launch, wizard, login, company-selection, Back Office, or power path described in the procedure; the available starting screen depends on current installation state.
Launch Muhasib ERP
Step 1: Start Muhasib ERP from the approved Windows shortcut or executable
Step 2: Wait while the launcher displays Initializing Muhasib ERP...
Step 3: Allow the launcher to check the database, initialize required data,
Allow the launcher to check the database, initialize required data, evaluate the licence, and load available modules.
Step 4: Continue according to the screen that opens
Continue according to the screen that opens:
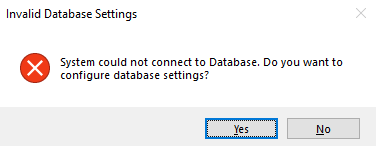
- Database Setup: connect or create the approved database.
- Activation: choose the correct licence path.
- Company/Administrator wizard: complete first-time onboarding.
- Sign in: enter your Muhasib credentials.
Step 5: If an error remains on screen, record its title and
If an error remains on screen, record its title and message before closing it.
Check your work
The launcher closes and an expected next screen appears. You should not see a repeating database, activation, initialization, or capacity error.
Take a moment to check your work before closing the window. This small check can save time later.
If something goes wrong
- Do not repeatedly restart during an apparent migration.
- Do not point the application at a different database merely to bypass an error.
- If the database revision or application build is uncertain, preserve the error and contact support.
Related guides
What to do next
# Resolve a Muhasib Startup Interruption
How to Resolve a Muhasib Startup Interruption in Muhasib ERP
Overview
This guide will help you classify a startup interruption and take a safe recovery action without risking the business database or licence assignment.
If this issue is stopping your work, do not worry. Follow the steps one at a time, and check the result before trying again.
Muhasib advances to the next allowed lifecycle state or preserves the current state for safe diagnosis; the verification section identifies the expected result.
Who can do this
You need access to Use requires the rights and business authority described by the workflow. Database, licence, user, company, or system changes require the responsible administrator.
Before you start
Record the application version/build if known, database server and database name without credentials, the exact message, and whether this is a new installation, ordinary launch, or upgrade.
Before saving, check that the correct company is open and that you have permission to complete this task.
Where to find it
Follow the launch, wizard, login, company-selection, Back Office, or power path described in the procedure; the available starting screen depends on current installation state.
Resolve a Muhasib Startup Interruption
Step 1: Identify the stage that failed
Identify the stage that failed:
- before database selection: workstation settings or installation;
- while connecting: server, network, authentication, or database selection;
- while initializing: missing base records, database revision, or migration;
- during activation: network, account, subscription, pairing, or terminal state;
- after activation: plan feature or capacity limit;
- before workspace: company, user, role, or terminal registration.
Step 2: Copy the exact error text or take a sanitized screenshot
Step 3: Check only the dependency named by the error. For example,
Check only the dependency named by the error. For example, check network reachability before changing database settings.
Step 4: Retry once after correcting a known temporary condition
Step 5: If the error concerns migration, partial database creation, licence transfer,
If the error concerns migration, partial database creation, licence transfer, or an unknown data change, stop and contact support.
Step 6: Provide the installed version, database revision when available, terminal type,
Provide the installed version, database revision when available, terminal type, and recent change that preceded the failure.
Check your work
The corrected launch advances past the failed stage and reaches the expected next screen. Make sure the selected company and database are the intended ones.
Take a moment to check your work before closing the window. This small check can save time later.
If something goes wrong
If the expected result is not shown, stop repeated attempts, check the active database/workspace/user/licence context, preserve the exact message, and follow the related recovery article.
Related guides
What to do next
# Connect Muhasib ERP to an Existing Database
How to Connect Muhasib ERP to an Existing Database in Muhasib ERP
Overview
This guide will help you configure this workstation to use an existing approved Muhasib database.
Muhasib stores the selected host, database, authentication mode, and needed credentials in the local workstation settings. On startup it may create missing default settings or apply supported initialization/migration work.
Who can do this
You need access to Access to Database Setup and valid SQL Server. Get the connection details from the database administrator.
Before you start
Confirm the SQL Server name, database name, authentication method, and whether the database revision is compatible with this Muhasib build. Keep a verified backup before connecting a newer build.
Before saving, check that the correct company is open and that you have permission to complete this task.
Where to find it
Follow the launch, wizard, login, company-selection, Back Office, or power path described in the procedure; the available starting screen depends on current installation state.
Connect Muhasib ERP to an Existing Database
Step 1: Open Database Setup during first launch or through the approved
Open Database Setup during first launch or through the approved setup route.
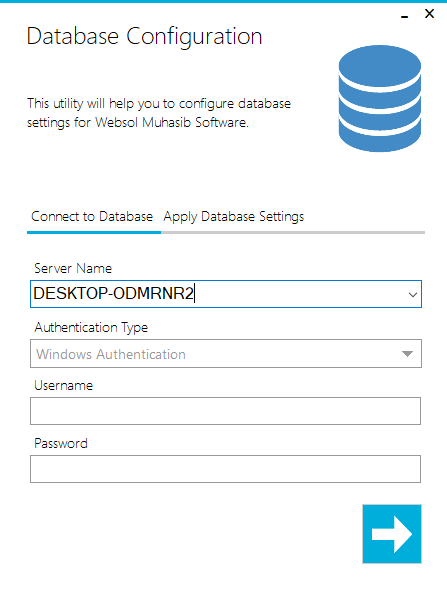
Step 2: In Server, select or enter the approved SQL Server
Step 3: Choose the authentication method
Choose the authentication method:
- Windows authentication uses the current Windows identity.
- SQL authentication requires the assigned database username and password.
Step 4: Connect to the server so Muhasib can load the database list
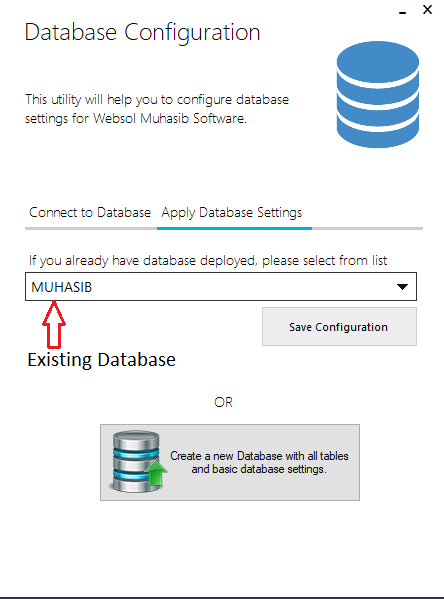
Step 5: Select the exact existing Muhasib database. Do not select an
Select the exact existing Muhasib database. Do not select an empty or unrelated business database.
Step 6: Choose Apply DB Settings
Step 7: Continue through initialization, activation, onboarding, or sign-in as prompted
Check your work
Restart Muhasib and confirm that it reconnects to the same database and shows the expected company or sign-in context.
Take a moment to check your work before closing the window. This small check can save time later.
If something goes wrong
- An empty database list usually indicates connectivity, authentication, or SQL permissions problems.
- If the chosen database is not recognized as Muhasib, stop rather than allowing uncertain initialization.
- Never expose the stored SQL password in a screenshot or support attachment.
Related guides
What to do next
# Create a New Muhasib Database
How to Create a New Muhasib Database in Muhasib ERP
Overview
This guide will help you create a new empty Muhasib database for a new workspace on an approved SQL Server.
The available build creates the fixed database name MUHASIB, applies its base script in batches, and saves the new connection in local workstation settings. Creation changes SQL Server state and may leave a partial database if interrupted; verified rollback behavior is still required.
Who can do this
You need access to Database-creation rights on a non-production or approved SQL Server. This procedure must not be used to repair or replace an existing company database.
Before you start
Make sure a database named MUHASIB does not already contain required data. Understand the organization's backup, server naming, collation, security, and recovery policies.
Before saving, check that the correct company is open and that you have permission to complete this task.
Where to find it
Follow the launch, wizard, login, company-selection, Back Office, or power path described in the procedure; the available starting screen depends on current installation state.
Create a New Muhasib Database
Step 1: Open Database Setup
Step 2: Select the approved SQL Server and authentication method
Step 3: Enter SQL credentials only when SQL authentication is required
Step 4: Verify that you are connected to the intended server
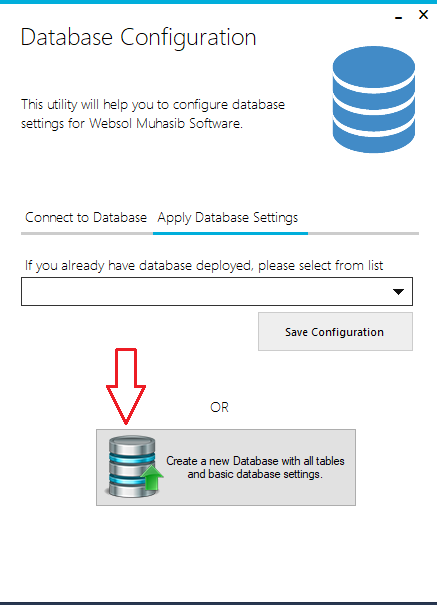
Step 5: Choose Create new Database
Step 6: Allow Muhasib to create MUHASIB and execute its embedded base
Allow Muhasib to create MUHASIB and execute its embedded base database script.
Step 7: Do not close the application or interrupt SQL Server while
Do not close the application or interrupt SQL Server while creation is in progress.
Step 8: After completion, continue to activation and first-company onboarding
Check your work
Make sure Muhasib reconnects successfully, recognizes the expected database revision, and opens activation or onboarding. A database existing in SQL Server is not enough proof; the application must initialize it successfully.
Take a moment to check your work before closing the window. This small check can save time later.
If something goes wrong
- If
MUHASIB already exists, do not overwrite or remove it. Confirm its owner and purpose.
- If permissions fail, have the database administrator create or authorize the database through the supported deployment process.
- If creation stops partway, preserve logs and contact support before retrying or cleaning up.
Related guides
What to do next
# Activation and Licence Access
Choose an activation path, connect a subscription, manage terminals, and understand licence limits.
# Choose the Correct Muhasib Activation Path
How to Choose the Correct Muhasib Activation Path in Muhasib ERP
Overview
This guide will help you select the activation path that matches the subscription and terminal you are authorized to use.
Muhasib advances to the next allowed lifecycle state or preserves the current state for safe diagnosis; the verification section identifies the expected result.
Who can do this
You need access to Use requires the rights and business authority described by the workflow. Database, licence, user, company, or system changes require the responsible administrator.
Before you start
Confirm who owns the subscription, whether this computer is the primary or an more terminal, and whether the database belongs to a new or existing Muhasib workspace.
Before saving, check that the correct company is open and that you have permission to complete this task.
Where to find it
Follow the launch, wizard, login, company-selection, Back Office, or power path described in the procedure; the available starting screen depends on current installation state.
Choose the Correct Muhasib Activation Path
MUHASIB ACTIVATION
↓
Identify Current State
↓
|
New Setup
↓
Wizard
|
Existing Setup
↓
Login / Company
|
Re-activation
↓
Licence Path
|
↓
Perform Activation
↓
Verify Licence
Step 1: Identify the current lifecycle state and intended outcome
Step 2: Follow the decision or safety guidance already described in this article
CURRENT STATE
↓
What are you trying
to achieve?
↓
|
New
Activation
↓
Path A
|
Existing
Database
↓
Path B
|
Other
Scenario
↓
Path C
|
Step 4: Verify the resulting screen, identity, and state before continuing
Check your work
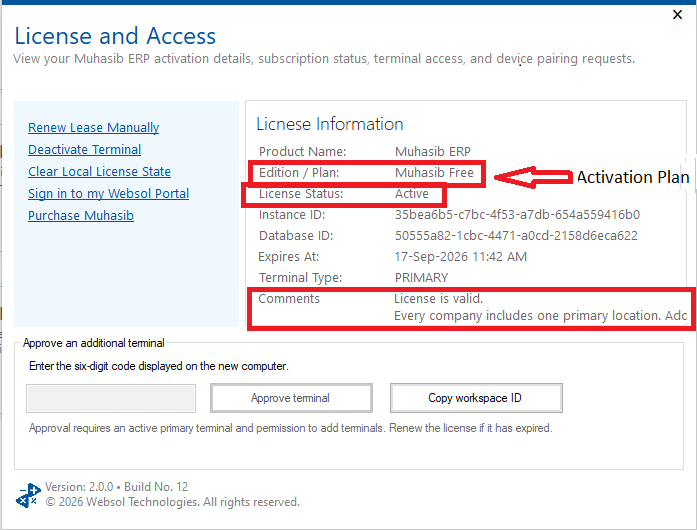
After activation, Licence Information should show the expected plan/status, database identity, instance identity, and terminal type. Continue only if they match the intended deployment.
Take a moment to check your work before closing the window. This small check can save time later.
If something goes wrong
If the expected result is not shown, stop repeated attempts, check the active database/workspace/user/licence context, preserve the exact message, and follow the related recovery article.
Related guides
What to do next
# Activate Muhasib Free
How to Activate Muhasib Free in Muhasib ERP
Overview
This guide will help you register an allowed business and activate the current Muhasib workspace on the Free plan.
Muhasib associates the local instance and database identity with the resulting licence state. A new database normally proceeds to company and administrator onboarding; an existing set up database may proceed toward sign-in.
Who can do this
You need access to Use requires the rights and business authority described by the workflow. Database, licence, user, company, or system changes require the responsible administrator.
Before you start
Connect the intended Muhasib database and make sure internet access to the authorized activation service. Use business contact information that you are authorized to submit.
Before saving, check that the correct company is open and that you have permission to complete this task.
Where to find it
Follow the launch, wizard, login, company-selection, Back Office, or power path described in the procedure; the available starting screen depends on current installation state.
Activate Muhasib Free
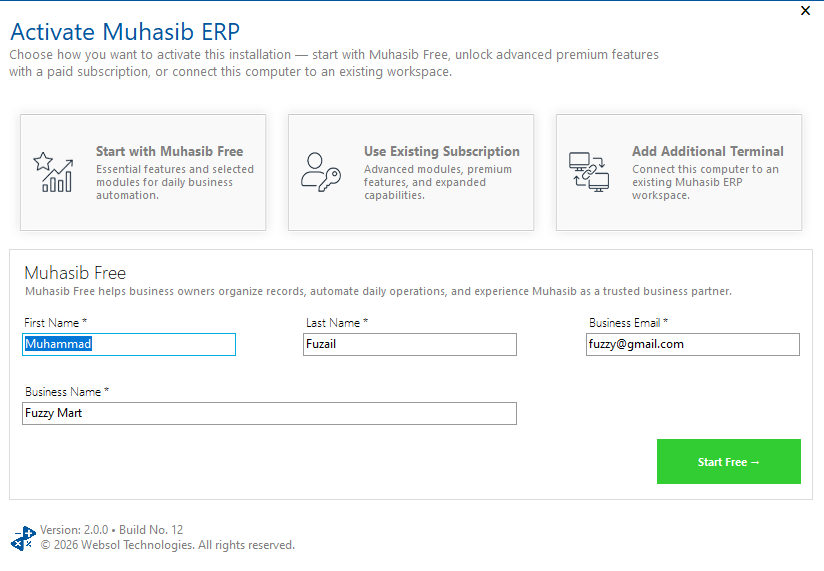
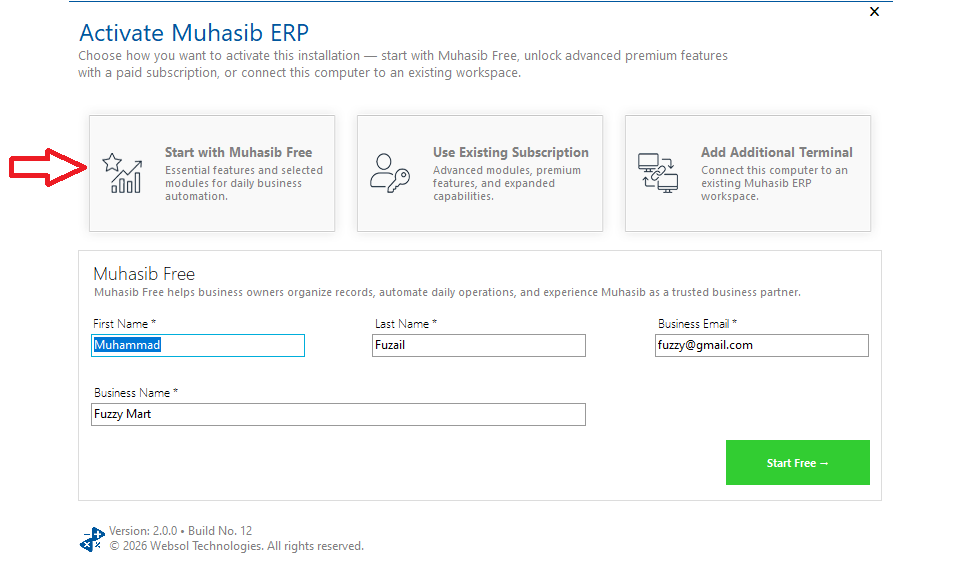
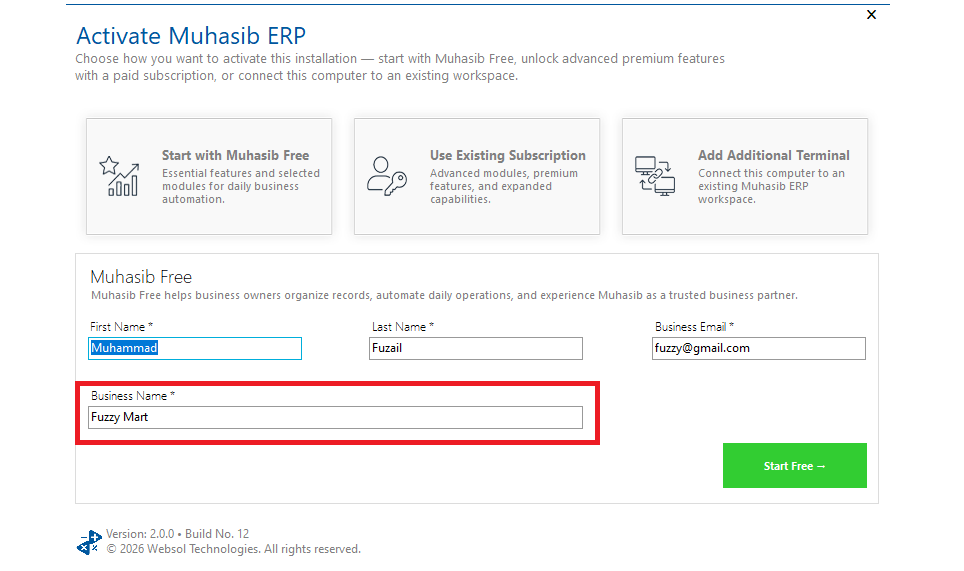
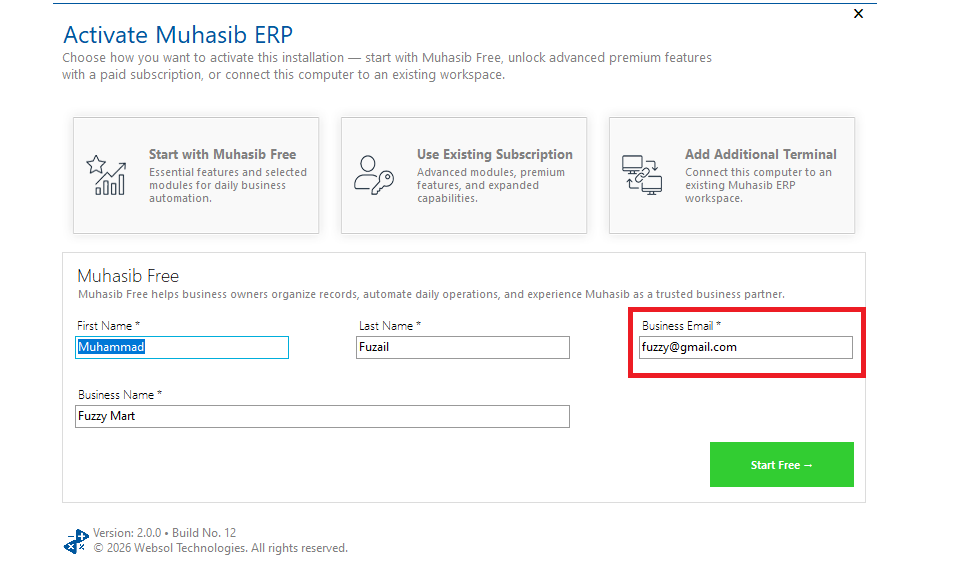
Step 1: In the Activation wizard, choose Start Free
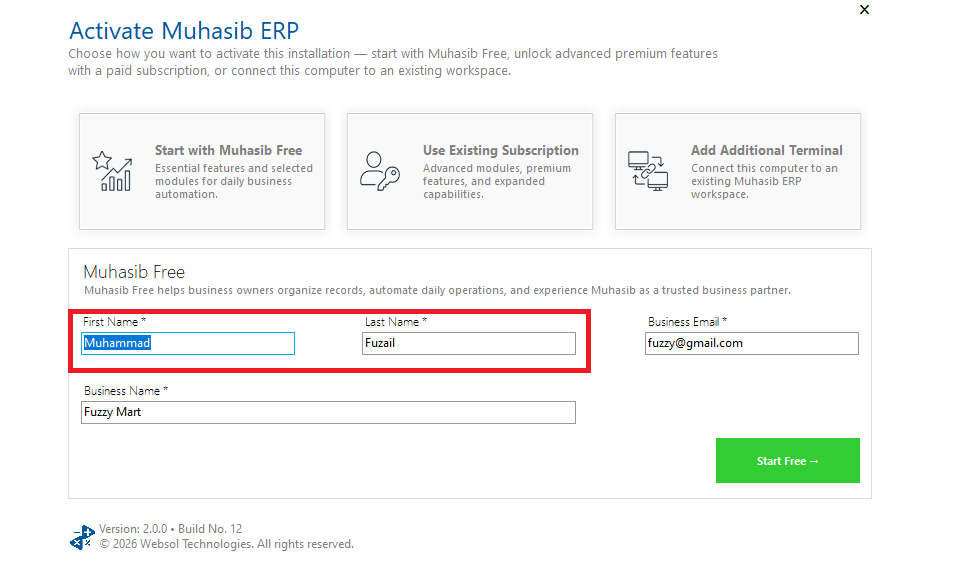
Step 2: Enter the contact's first name and last name
Step 3: Enter the business name
Step 4: Enter the authorized business email address
Step 5: Submit the activation request
Step 6: Wait for Muhasib has been activated successfully before closing the
Wait for Muhasib has been activated successfully before closing the wizard.
Check your work
Open Licence Information and confirm that status, plan, database identity, instance identity, and terminal type match the intended workspace.
Take a moment to check your work before closing the window. This small check can save time later.
If something goes wrong
- Complete every required identity/business field.
- If activation is refused, do not repeatedly create identities or databases; preserve the service message.
- If the organization already owns a subscription, use that subscription rather than creating an unrelated Free workspace.
Related guides
What to do next
# Activate an Existing Muhasib Subscription
### How to Activate an Existing Muhasib Subscription in Muhasib ERP
### Overview
This guide will help you sign in to the Websol Portal, select an active Muhasib subscription, and activate this computer as its primary terminal.
The activation service binds the selected subscription to the workspace/database and identifies this computer as primary. Selecting the wrong subscription can attach the instance to the wrong entitlement.
### Who can do this
You need access to Use requires the rights and business authority described by the workflow. Database, licence, user, company, or system changes require the responsible administrator.
### Before you start
Connect the correct workspace database. Have the authorized Websol Portal email and password, and confirm this computer is intended to become the primary terminal.
Before saving, check that the correct company is open and that you have permission to complete this task.
### Where to find it
Follow the launch, wizard, login, company-selection, Back Office, or power path described in the procedure; the available starting screen depends on current installation state.
### Activate an Existing Muhasib Subscription
#### Step 1: Open the existing-subscription section of the Activation wizard
#### Step 2: Enter the Websol Portal email and password
#### Step 3: Choose the portal sign-in action
#### Step 4: After subscriptions load, review the available active subscriptions
#### Step 5: Select the subscription assigned to this business and database
#### Step 6: Choose the action to activate the selected subscription
#### Step 7: Wait for confirmation that this computer has been activated as
Wait for confirmation that this computer has been activated as the primary terminal.
### Check your work
Review Licence Information and confirm the expected plan, status, expiry, database identity, instance identity, and primary-terminal type.
Take a moment to check your work before closing the window. This small check can save time later.
### If something goes wrong
- If no subscription appears, check the portal account owns an active Muhasib subscription.
- If the selected record lacks a valid subscription ID, sign in again and reload subscriptions.
- If another computer is already primary, use the controlled transfer path only with the subscription owner's approval.
### Related guides
- [Choose the Correct Muhasib Activation Path](https://docs.muhasiberp.com/link/556)
- [Transfer Primary Muhasib Access to This Computer](https://docs.muhasiberp.com/link/559)
- [Activate an Additional Muhasib Terminal](https://docs.muhasiberp.com/link/560)
- [Review and Maintain Muhasib Licence Access](https://docs.muhasiberp.com/link/561)
### What to do next
[**Choose the Correct Muhasib Activation Path**](https://docs.muhasiberp.com/link/556).
# Transfer Primary Muhasib Access to This Computer
### How to Transfer Primary Muhasib Access to This Computer in Muhasib ERP
### Overview
This guide will help you move the subscription's primary-terminal assignment to this computer with a clear understanding of the effect on the previous primary.
The activation service changes which computer represents the primary terminal. The previous primary may lose primary functionality and may require an more-terminal workflow or another authorized recovery action.
### Who can do this
You need access to Authorization from the subscription owner and Websol Portal access for the active subscription.
### Before you start
Confirm the old and new computers, the exact workspace database, and how the old primary will be recovered or re-paired if required. Make sure no critical work is in progress on either terminal.
Before saving, check that the correct company is open and that you have permission to complete this task.
### Where to find it
Follow the launch, wizard, login, company-selection, Back Office, or power path described in the procedure; the available starting screen depends on current installation state.
### Transfer Primary Muhasib Access to This Computer
#### Step 1: Open the Activation wizard on the new primary computer
#### Step 2: Sign in to the authorized Websol Portal account
#### Step 3: Select the correct active Muhasib subscription
#### Step 4: Choose Transfer Primary
#### Step 5: Read the warning that the previous primary terminal may stop
Read the warning that the previous primary terminal may stop working as primary.
#### Step 6: Confirm only when the subscription, database, and new computer are
Confirm only when the subscription, database, and new computer are correct.
#### Step 7: Wait for the transfer result before closing Muhasib on either terminal
### Check your work
Confirm the new computer's terminal type in Licence Information, then test the old computer's resulting status without attempting another transfer.
Take a moment to check your work before closing the window. This small check can save time later.
### If something goes wrong
- If the transfer fails, preserve the exact service message and current state of both terminals.
- Do not clear local licence state on both computers as a troubleshooting shortcut.
- Contact support if either terminal's identity no longer matches the intended workspace.
### Related guides
- [Activate an Existing Muhasib Subscription](https://docs.muhasiberp.com/link/558)
- [Activate an Additional Muhasib Terminal](https://docs.muhasiberp.com/link/560)
- [Review and Maintain Muhasib Licence Access](https://docs.muhasiberp.com/link/561)
- [Request Muhasib Support](https://docs.muhasiberp.com/link/573)
### What to do next
[**Activate an Existing Muhasib Subscription**](https://docs.muhasiberp.com/link/558).
# Activate an Additional Muhasib Terminal
### How to Activate an Additional Muhasib Terminal in Muhasib ERP
### Overview
This guide will help you pair an authorized more computer with an existing Muhasib workspace without transferring primary access.
The more computer receives a licence-terminal relationship to the existing workspace. It does not become the primary unless a separate primary-transfer action is performed.
### Who can do this
You need access to Use requires the rights and business authority described by the workflow. Database, licence, user, company, or system changes require the responsible administrator.
### Before you start
The workspace must already have an active primary terminal. Prepare the more computer with the correct database connection and get access to the primary-side pairing workflow.
Before saving, check that the correct company is open and that you have permission to complete this task.
### Where to find it
Follow the launch, wizard, login, company-selection, Back Office, or power path described in the procedure; the available starting screen depends on current installation state.
### Activate an Additional Muhasib Terminal
#### Step 1: On the additional computer, choose the additional-terminal option in the
On the more computer, choose the more-terminal option in the Activation wizard.
#### Step 2: Confirm that the displayed workspace or instance identity belongs to
Make sure the shown workspace or instance identity belongs to the intended database.
#### Step 3: Begin the pairing request
#### Step 4: On the authorized primary side, review and approve the request
On the authorized primary side, review and approve the request according to the shown workflow.
#### Step 5: Enter or exchange the generated pairing code/token only through the
Enter or exchange the generated pairing code/token only through the intended secure channel.
#### Step 6: Complete pairing on the additional computer before the credential expires
Complete pairing on the more computer before the credential expires.
#### Step 7: Restart or continue when instructed
### Check your work
Review Licence Information on both computers. Make sure the original remains primary, the new computer is more, and both reference the intended database/workspace.
Take a moment to check your work before closing the window. This small check can save time later.
### If something goes wrong
- Generate a new pairing request if the code/token expires.
- Reject requests whose device or workspace identity is unfamiliar.
- If plan capacity is reached, resolve entitlement capacity rather than transferring primary access accidentally.
### Related guides
- [Choose the Correct Muhasib Activation Path](https://docs.muhasiberp.com/link/556)
- [Activate an Existing Muhasib Subscription](https://docs.muhasiberp.com/link/558)
- [Transfer Primary Muhasib Access to This Computer](https://docs.muhasiberp.com/link/559)
- [Understand Muhasib Plan Limits and Restricted Access](https://docs.muhasiberp.com/link/562)
- [Review and Maintain Muhasib Licence Access](https://docs.muhasiberp.com/link/561)
### What to do next
[**Choose the Correct Muhasib Activation Path**](https://docs.muhasiberp.com/link/556).
# Review and Maintain Muhasib Licence Access
### How to Review and Maintain Muhasib Licence Access in Muhasib ERP
### Overview
This guide will help you identify the licence assigned to this Muhasib installation and choose a safe maintenance action.
Renewal requests refreshed licence information. Deactivation and clearing local licence state require confirmation and then close Muhasib. Clearing local state is not the same as cancelling a subscription or safely transferring primary access.
### Who can do this
You need access to Access to licence information and authorization from the subscription owner for renewal, deactivation, or clearing local state.
### Before you start
Finish active transactions and record the selected company and database. Deactivation or clearing local state exits Muhasib and can prevent access until activation is restored.
Before saving, check that the correct company is open and that you have permission to complete this task.
### Where to find it
Follow the launch, wizard, login, company-selection, Back Office, or power path described in the procedure; the available starting screen depends on current installation state.
### Review and Maintain Muhasib Licence Access
#### Step 1: Open Licence Information from the Back Office licence/help area
#### Step 2: Review the displayed plan, status, expiry, database ID, instance ID,
Review the shown plan, status, expiry, database ID, instance ID, and terminal type.
#### Step 3: Confirm that the database and instance belong to the intended workspace
Make sure the database and instance belong to the intended workspace.
#### Step 4: Choose only the action needed
Choose only the action needed:
- renew or refresh when entitlement should remain on this computer;
- open the portal or purchase route to manage the subscription;
- deactivate when this terminal should be released through the supported service;
- clear local state only as an authorized recovery step.
#### Step 5: Read every confirmation before proceeding
### Check your work
For a refresh or renewal, reopen Licence Information and confirm the status and expiry. For deactivation or cleared state, relaunch and confirm the expected activation screen before attempting recovery.
Take a moment to check your work before closing the window. This small check can save time later.
### If something goes wrong
- If database or instance identity is unexpected, stop before changing licence state.
- If renewal succeeds in the portal but the client remains stale, use the supported refresh/restart path.
- Preserve service messages when contacting support; do not send tokens or passwords.
### Related guides
- [Choose the Correct Muhasib Activation Path](https://docs.muhasiberp.com/link/556)
- [Transfer Primary Muhasib Access to This Computer](https://docs.muhasiberp.com/link/559)
- [Activate an Additional Muhasib Terminal](https://docs.muhasiberp.com/link/560)
- [Understand Muhasib Plan Limits and Restricted Access](https://docs.muhasiberp.com/link/562)
- [Request Muhasib Support](https://docs.muhasiberp.com/link/573)
### What to do next
[**Choose the Correct Muhasib Activation Path**](https://docs.muhasiberp.com/link/556).
# Understand Muhasib Plan Limits and Restricted Access
### Understand Muhasib Plan Limits and Restricted Access
### Overview
This guide will help you distinguish a subscription feature restriction from a capacity warning or block and choose the correct remedy.
Muhasib advances to the next allowed lifecycle state or preserves the current state for safe diagnosis; the verification section identifies the expected result.
### Who can do this
You need access to Use requires the rights and business authority described by the workflow. Database, licence, user, company, or system changes require the responsible administrator.
### Before you start
Confirm the intended workstation, database, company/workspace, user or subscription context, and preserve any in-progress work before proceeding.
Before saving, check that the correct company is open and that you have permission to complete this task.
### Where to find it
Follow the launch, wizard, login, company-selection, Back Office, or power path described in the procedure; the available starting screen depends on current installation state.
### Understand Muhasib Plan Limits and Restricted Access
#### Step 1: Record the exact warning or blocked-action message
#### Step 2: Review Licence Information for plan, status, expiry, and terminal type
#### Step 3: Determine whether the entire module is absent or only one
Determine whether the entire module is absent or only one action is unavailable.
#### Step 4: Ask an administrator to compare the user's role permission without
Ask an administrator to compare the user's role permission without changing it merely to test access.
#### Step 5: If the message names a capacity, count only active records
If the message names a capacity, count only active records in the scope defined by the plan.
#### Step 6: Use the portal or subscription owner to resolve entitlement or capacity
#### Step 7: Restart or sign in again only when instructed so refreshed
Restart or sign in again only when instructed so refreshed rights and features can load.
### Check your work
The intended module/action becomes available to an authorized user, and Licence Information shows the expected active entitlement. Do not check by bypassing role controls.
Take a moment to check your work before closing the window. This small check can save time later.
### If something goes wrong
- A missing button can result from either plan or role filtering.
- Company, location, terminal, user, item, customer, and supplier capacities may have different scopes.
- Never delete business records solely to reduce a licence count without dependency review and approval.
### Related guides
- [Review and Maintain Muhasib Licence Access](https://docs.muhasiberp.com/link/561)
- [Understand Why a Module or Action Is Unavailable](https://docs.muhasiberp.com/link/569)
- [Grant and Revoke Muhasib Permissions](https://docs.muhasiberp.com/link/187)
- [Request Muhasib Support](https://docs.muhasiberp.com/link/573)
### What to do next
[**Review and Maintain Muhasib Licence Access**](https://docs.muhasiberp.com/link/561).
# First-Time Onboarding
Create the first company workspace and its administrator account.
# Create the First Company Workspace
How to Create the First Company Workspace in Muhasib ERP
Overview
This guide will help you create the first company workspace with its identity, contact, currency, tax, and branding information.
Muhasib creates the company and associates it with the super-administration role. A missing super-administration role prevents creation. The next first-run task is creating the workspace administrator.
Who can do this
You need access to First-run database administrator. The database must contain the required super-administration role.
Before you start
Prepare the legal company name, primary address/contact, business email, base currency name/code/symbol/words, decimal places, registration number, NTN/STRN where needed, and a sanitized logo about 270 x 100 pixels.
Before saving, check that the correct company is open and that you have permission to complete this task.
Where to find it
Follow the launch, wizard, login, company-selection, Back Office, or power path described in the procedure; the available starting screen depends on current installation state.
Create the First Company Workspace
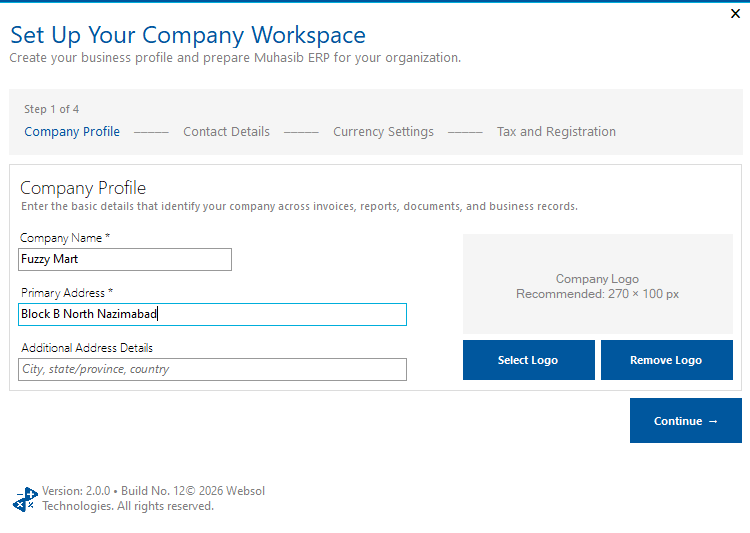
Step 1: In Step 1 of 4 - Company Profile, enter Company
In Step 1 of 4 - Company Profile, enter Company Name and Primary Address. Add the secondary address when needed.
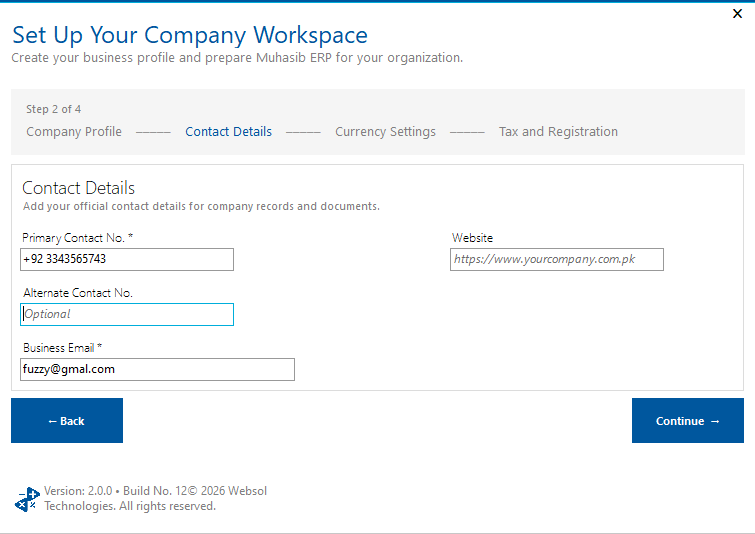
Step 2: In Step 2 of 4 - Contact Details, enter Primary
In Step 2 of 4 - Contact Details, enter Primary Contact No. and a valid Business Email. Add secondary contact and website as needed.
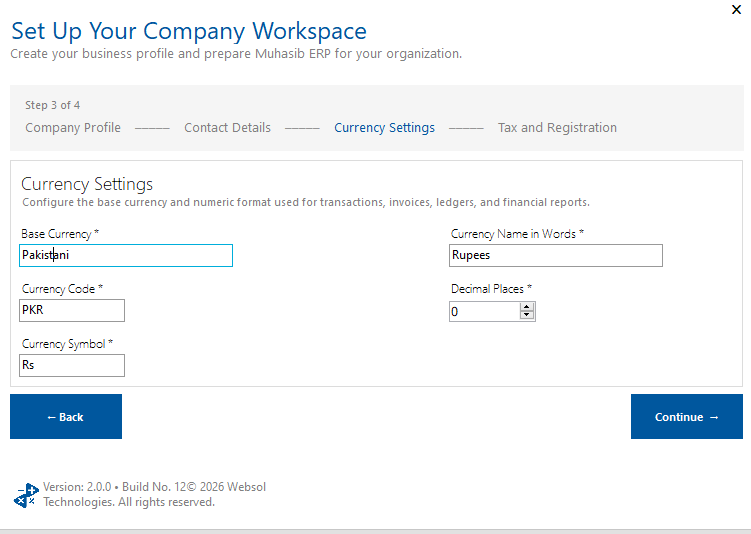
Step 3: In Step 3 of 4 - Currency Settings, enter Base
In Step 3 of 4 - Currency Settings, enter Base Currency, Currency Code, Currency Symbol, Currency Name in Words, and decimal places.
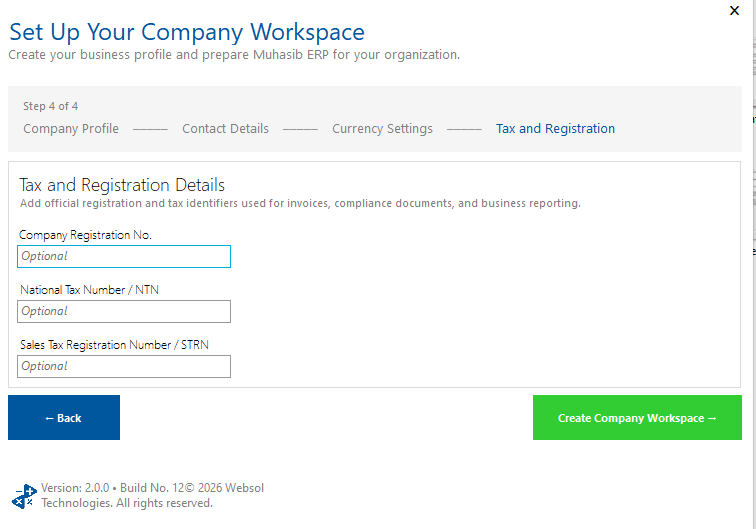
Step 4: In Step 4 of 4 - Tax/Registration, enter the applicable
In Step 4 of 4 - Tax/Registration, enter the needed registration number, NTN, and STRN.
Step 5: Select the approved company logo if required
Step 6: Review currency carefully; it affects transactions, invoices, ledgers, and financial
Review currency carefully; it affects transactions, invoices, ledgers, and financial reports.
Step 7: Save and wait for Company Workspace Created
Check your work
Confirm the new company name appears in the next onboarding/company context and that no duplicate or partial company was created.
Take a moment to check your work before closing the window. This small check can save time later.
If something goes wrong
- Company name, primary address/contact, business email, and all core currency fields are required by this workflow.
- Use a unique company name.
- If creation reports a missing super-administration role, stop and contact support rather than modifying database roles directly.
Related guides
What to do next
# Create the Workspace Administrator
### How to Create the Workspace Administrator in Muhasib ERP
### Overview
This guide will help you create the first active administrator who can sign in to the new Muhasib workspace.
Muhasib creates an active administrator account, allows login, assigns the setup role, and stores the password in its internal credential format. The workspace is then ready for sign-in.
### Who can do this
You need access to First-run onboarding access and the administrator role selected by the setup process.
### Before you start
Prepare the administrator's authorized name, contact details, unique User ID, and a private password. Do not use shared credentials.
Before saving, check that the correct company is open and that you have permission to complete this task.
### Where to find it
Follow the launch, wizard, login, company-selection, Back Office, or power path described in the procedure; the available starting screen depends on current installation state.
### Create the Workspace Administrator
#### Step 1: In Step 1 of 2 - Administrator Profile, enter First
In **Step 1 of 2 - Administrator Profile**, enter First Name. Add Last Name, national ID/CNIC or licence value, email, phone, mobile, and address as needed.
#### Step 2: Use a valid email format when an email is entered
#### Step 3: Continue to Step 2 of 2 - Sign-in Credentials
#### Step 4: Enter a unique User ID
#### Step 5: Enter a password of at least five characters, following any
Enter a password of at least five characters, following any stronger organizational policy.
#### Step 6: Enter the same value in Confirm Password
#### Step 7: Save and wait for Administrator Account Created
### Check your work
Sign in using the new User ID and password, then confirm the expected company and administrator access.
Take a moment to check your work before closing the window. This small check can save time later.
### If something goes wrong
- First Name, User ID, and password are validated by the available code.
- Correct invalid email formatting and password mismatch before retrying.
- If the User ID already exists, use a unique ID rather than altering another account during onboarding.
### Related guides
- [Create the First Company Workspace](https://docs.muhasiberp.com/link/563)
- [Sign In to Muhasib ERP](https://docs.muhasiberp.com/link/565)
- [Create a System User](https://docs.muhasiberp.com/link/183)
- [Create a User Role](https://docs.muhasiberp.com/link/186)
### What to do next
[**Create the First Company Workspace**](https://docs.muhasiberp.com/link/563).
# Sign In and Company Selection
Sign in safely, fix access problems, and open the correct company workspace.
# Select a Company Workspace
### How to Select a Company Workspace in Muhasib ERP
### Overview
This guide will help you enter the correct authorized company before performing Muhasib work.
The list contains companies assigned to the signed-in user's role. With only one assignment, Muhasib may select it automatically. Back Office also checks terminal registration and can return to selection when the company is not registered for this terminal.
### Who can do this
You need access to Use requires the rights and business authority described by the workflow. Database, licence, user, company, or system changes require the responsible administrator.
### Before you start
Sign in with a role assigned to at least one company. The current terminal must be registered for the selected company where required.
Before saving, check that the correct company is open and that you have permission to complete this task.
### Where to find it
Follow the launch, wizard, login, company-selection, Back Office, or power path described in the procedure; the available starting screen depends on current installation state.
### Select a Company Workspace
#### Step 1: On company selection, review the available columns: ID, Company, Address,
On company selection, review the available columns: ID, Company, Address, Contact, Email, and Registration.
#### Step 2: Enter part of the company name in the filter when the list is long
#### Step 3: Select the intended company
#### Step 4: Choose Continue, or double-click the company where supported
#### Step 5: If you do not want to continue with this account, choose Sign Out
### Check your work
In Back Office, confirm the company and user context before creating a transaction or changing settings.
Take a moment to check your work before closing the window. This small check can save time later.
### If something goes wrong
- If a company is missing, check the role's company assignment and licence scope.
- If selection loops back, check this terminal's company registration rather than choosing another company arbitrarily.
- If no company is assigned, contact an administrator; do not create a duplicate company.
### Related guides
- [Sign In to Muhasib ERP](https://docs.muhasiberp.com/link/565)
- [Navigate the Muhasib Back Office](https://docs.muhasiberp.com/link/568)
- [Switch to Another Company Workspace](https://docs.muhasiberp.com/link/574)
- [Understand Company, Location, Terminal, and Licence Identities](https://docs.muhasiberp.com/link/165)
### What to do next
[**Sign In to Muhasib ERP**](https://docs.muhasiberp.com/link/565).
# Sign In to Muhasib ERP
### How to Sign In to Muhasib ERP in Muhasib ERP
### Overview
This guide will help you authenticate with an active Muhasib account and reach the authorized company selection or workspace.
Muhasib accepts only a matching account that is active, allowed to log in, and not deleted. It creates the user session and loads the Back Office according to role permissions, company assignment, licence features, and terminal state.
the Remember option persists the entered username and password through local workstation settings. Use it only after the organization confirms the device and at-rest protection are acceptable.
### Who can do this
You need access to Use requires the rights and business authority described by the workflow. Database, licence, user, company, or system changes require the responsible administrator.
### Before you start
Get your own User ID and password. Make sure Muhasib is connected to the correct database and has completed activation.
Before saving, check that the correct company is open and that you have permission to complete this task.
### Where to find it
Follow the launch, wizard, login, company-selection, Back Office, or power path described in the procedure; the available starting screen depends on current installation state.
### Sign In to Muhasib ERP
#### Step 1: On Sign in to your business workspace, enter your User ID
#### Step 2: Enter your Password
#### Step 3: Leave Remember this device clear on shared, public, or insufficiently
Leave **Remember this device** clear on shared, public, or inenoughly protected computers.
#### Step 4: Select Sign In
#### Step 5: If more than one company is assigned, select the intended
If more than one company is assigned, select the intended company. A single assigned company may open automatically.
### Check your work
Confirm the shown user and company context before entering data. Make sure modules match your intended role.
Take a moment to check your work before closing the window. This small check can save time later.
### If something goes wrong
- Re-enter the User ID and password carefully.
- If credentials are correct but access is refused, an administrator should check Active User and Allow Login without resetting unrelated permissions.
- If the wrong company opens, sign out or switch company before creating records.
### Related guides
- [Resolve Muhasib Sign-In Problems](https://docs.muhasiberp.com/link/566)
- [Select a Company Workspace](https://docs.muhasiberp.com/link/567)
- [Navigate the Muhasib Back Office](https://docs.muhasiberp.com/link/568)
- [Sign Out and Exit Muhasib ERP Safely](https://docs.muhasiberp.com/link/576)
### What to do next
[**Resolve Muhasib Sign-In Problems**](https://docs.muhasiberp.com/link/566).
# Resolve Muhasib Sign-In Problems
### How to Resolve Muhasib Sign-In Problems in Muhasib ERP
### Overview
This guide will help you identify the likely sign-in failure and restore access through an authorized administrator without weakening security.
If this issue is stopping your work, do not worry. Follow the steps one at a time, and check the result before trying again.
Sign-in succeeds only when the credential matches an active, login-enabled, non-deleted administrator record. Permission and company problems may appear after authentication rather than as a credential error.
### Who can do this
You need access to Use requires the rights and business authority described by the workflow. Database, licence, user, company, or system changes require the responsible administrator.
### Before you start
Confirm the intended workstation, database, company/workspace, user or subscription context, and preserve any in-progress work before proceeding.
Before saving, check that the correct company is open and that you have permission to complete this task.
### Where to find it
Follow the launch, wizard, login, company-selection, Back Office, or power path described in the procedure; the available starting screen depends on current installation state.
### Resolve Muhasib Sign-In Problems
#### Step 1: Confirm Muhasib is connected to the intended database
#### Step 2: Enter both User ID and Password; blank fields cannot authenticate
#### Step 3: Check Caps Lock and keyboard layout, then retry once
#### Step 4: If access still fails, ask an authorized administrator to locate
If access still fails, ask an authorized administrator to locate the user record and check:
- the User ID is correct;
- **Active User** is enabled;
- **Allow Login** is enabled;
- the account has not been removed;
- a valid role and company assignment exist.
#### Step 5: If the password must be changed, follow the approved user-management
If the password must be changed, follow the approved user-management process and communicate it securely.
#### Step 6: Sign out/restart when role or licence changes require the session
Sign out/restart when role or licence changes require the session to reload.
### Check your work
The user reaches the correct company selection/workspace and can access only the intended modules and actions.
Take a moment to check your work before closing the window. This small check can save time later.
### If something goes wrong
- Do not reveal whether a guessed User ID exists to unauthorized people.
- Do not enable a deleted or disabled account without confirming why it was restricted.
- Do not share passwords through tickets, screenshots, or group messages.
### Related guides
- [Sign In to Muhasib ERP](https://docs.muhasiberp.com/link/565)
- [Create a System User](https://docs.muhasiberp.com/link/183)
- [Grant and Revoke Muhasib Permissions](https://docs.muhasiberp.com/link/187)
- [Request Muhasib Support](https://docs.muhasiberp.com/link/573)
### What to do next
[**Sign In to Muhasib ERP**](https://docs.muhasiberp.com/link/565).
# Workspace and Common Controls
Learn the Back Office layout, Quick Launcher, notifications, permissions, and unavailable actions.
# Navigate the Muhasib Back Office
### How to Navigate the Muhasib Back Office in Muhasib ERP
### Overview
This guide will help you recognize the main Back Office areas and open an authorized module or common task safely.
Muhasib advances to the next allowed lifecycle state or preserves the current state for safe diagnosis; the verification section identifies the expected result.
### Who can do this
You need access to Use requires the rights and business authority described by the workflow. Database, licence, user, company, or system changes require the responsible administrator.
### Before you start
Sign in and confirm the selected company. Module visibility depends on both the subscription and your role.
Before saving, check that the correct company is open and that you have permission to complete this task.
### Where to find it
Follow the launch, wizard, login, company-selection, Back Office, or power path described in the procedure; the available starting screen depends on current installation state.
### Navigate the Muhasib Back Office
#### Step 1: Confirm the active company and signed-in user
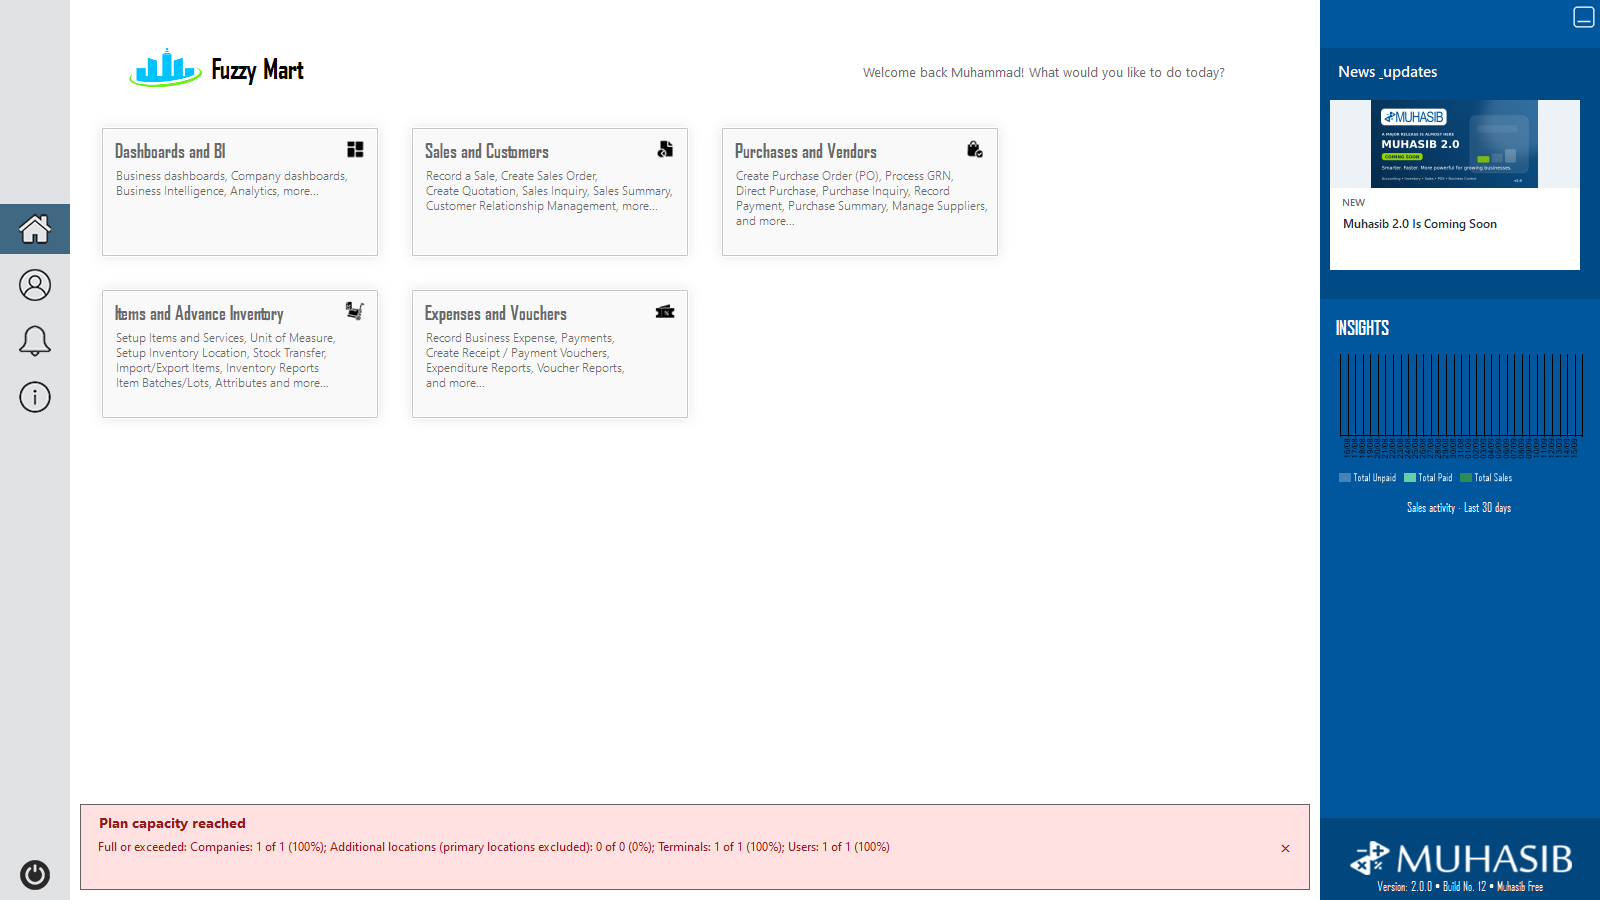
#### Step 2: Review visible module tiles. Absence may reflect role permission, plan
Review visible module tiles. Absence may reflect role permission, plan entitlement, settings, or company/terminal context.
#### Step 3: Open the module that contains your intended task
#### Step 4: Select the exact transaction, maintenance, inquiry, or report action
#### Step 5: Keep the resulting form within the same company context until
Keep the resulting form within the same company context until saved or closed.
#### Step 6: Use the supported power options to switch company, restart, or log out
### Check your work
The desired form opens with the correct company/user context and only authorized actions enabled.
Take a moment to check your work before closing the window. This small check can save time later.
### If something goes wrong
- Diagnose missing actions as permission, plan, setting, capacity, company, or terminal issues before changing settings.
- Do not run synchronization or Day End merely to clear a notification.
- Record version and database revision before requesting support.
### Related guides
- [Understand Why a Module or Action Is Unavailable](https://docs.muhasiberp.com/link/569)
- [Use the Muhasib Quick Launcher](https://docs.muhasiberp.com/link/570)
- [Review and Manage Notifications](https://docs.muhasiberp.com/link/571)
- [Check the Installed Muhasib Version and Database Revision](https://docs.muhasiberp.com/link/572)
- [Sign Out and Exit Muhasib ERP Safely](https://docs.muhasiberp.com/link/576)
### What to do next
[**Understand Why a Module or Action Is Unavailable**](https://docs.muhasiberp.com/link/569).
# Understand Why a Module or Action Is Unavailable
### Understand Why a Module or Action Is Unavailable
### Overview
This guide will help you identify whether an unavailable action is caused by permission, subscription, settings, capacity, company, terminal, or data prerequisites.
Muhasib workspace access is an intersection of licensed features and role permissions. Some forms also hide controls or tabs based on features and data. Granting a role permission cannot enable a feature absent from the plan.
### Who can do this
You need access to Use requires the rights and business authority described by the workflow. Database, licence, user, company, or system changes require the responsible administrator.
### Before you start
Confirm the intended workstation, database, company/workspace, user or subscription context, and preserve any in-progress work before proceeding.
Before saving, check that the correct company is open and that you have permission to complete this task.
### Where to find it
Follow the launch, wizard, login, company-selection, Back Office, or power path described in the procedure; the available starting screen depends on current installation state.
### Understand Why a Module or Action Is Unavailable
#### Step 1: Record the missing/disabled action, current company, user, and terminal
#### Step 2: Check whether the parent module is visible
#### Step 3: Ask an administrator to verify the exact view/add/update/delete/custom role permission
#### Step 4: Review the active plan and feature entitlement in Licence Information
#### Step 5: Check whether a required setting, company assignment, location, terminal, fiscal
Check whether a required setting, company assignment, location, terminal, fiscal year, working period, account, stock record, or parent master is missing.
#### Step 6: If a capacity message appears, identify the named resource and
If a capacity message appears, identify the named resource and plan limit.
#### Step 7: After an authorized change, restart or sign in again when required
### Check your work
The intended authorized action appears and succeeds for the correct role without exposing unrelated modules.
Take a moment to check your work before closing the window. This small check can save time later.
### If something goes wrong
If the expected result is not shown, stop repeated attempts, check the active database/workspace/user/licence context, preserve the exact message, and follow the related recovery article.
### Related guides
- [Understand Muhasib Plan Limits and Restricted Access](https://docs.muhasiberp.com/link/562)
- [Grant and Revoke Muhasib Permissions](https://docs.muhasiberp.com/link/187)
- [Audit a User's Effective Access](https://docs.muhasiberp.com/link/188)
- [Request Muhasib Support](https://docs.muhasiberp.com/link/573)
### What to do next
[**Understand Muhasib Plan Limits and Restricted Access**](https://docs.muhasiberp.com/link/562).
# Use the Muhasib Quick Launcher
### How to Use the Muhasib Quick Launcher in Muhasib ERP
### Overview
This guide will help you open a frequently used authorized task directly from the Back Office.
Muhasib advances to the next allowed lifecycle state or preserves the current state for safe diagnosis; the verification section identifies the expected result.
### Who can do this
You need access to Use requires the rights and business authority described by the workflow. Database, licence, user, company, or system changes require the responsible administrator.
### Before you start
The destination task must be included in the plan, permitted by your role, and available in the selected company.
Before saving, check that the correct company is open and that you have permission to complete this task.
### Where to find it
Follow the launch, wizard, login, company-selection, Back Office, or power path described in the procedure; the available starting screen depends on current installation state.
### Use the Muhasib Quick Launcher
#### Step 1: Locate Quick Launcher in Back Office
#### Step 2: Review the available shortcuts
#### Step 3: Select the exact intended task
#### Step 4: Confirm the opened form and company context before entering data
#### Step 5: Close the form when finished or return to the workspace
The reviewed workspace source includes shortcuts for Sales Order, Delivery, POS Sale, Purchase, GRN, Purchase Order, payment-account transfer, Voucher, Supplier Payment, and Customer Payment. The actual list can vary by build, settings, role, and plan.
### Check your work
The shortcut opens the same authorized task available through its module and does not bypass permissions or prerequisites.
Take a moment to check your work before closing the window. This small check can save time later.
### If something goes wrong
- A missing shortcut does not prove the module is unavailable; open the module and check effective access.
- Current and legacy Quick Launcher settings differ in source. Use the your Muhasib installation's list.
### Related guides
- [Navigate the Muhasib Back Office](https://docs.muhasiberp.com/link/568)
- [Configure the Quick Launcher](https://docs.muhasiberp.com/link/199)
- [Understand Why a Module or Action Is Unavailable](https://docs.muhasiberp.com/link/569)
### What to do next
[**Navigate the Muhasib Back Office**](https://docs.muhasiberp.com/link/568).
# Review and Manage Notifications
### How to Review and Manage Notifications in Muhasib ERP
### Overview
This guide will help you find, read, print, and—when authorized—remove Muhasib notifications safely.
Muhasib advances to the next allowed lifecycle state or preserves the current state for safe diagnosis; the verification section identifies the expected result.
### Who can do this
You need access to Use requires the rights and business authority described by the workflow. Database, licence, user, company, or system changes require the responsible administrator.
### Before you start
Understand whether the notification represents an unresolved business condition. Deleting a notification does not necessarily fix the condition that generated it.
Before saving, check that the correct company is open and that you have permission to complete this task.
### Where to find it
Follow the launch, wizard, login, company-selection, Back Office, or power path described in the procedure; the available starting screen depends on current installation state.
### Review and Manage Notifications
#### Step 1: Open Notifications from Back Office
#### Step 2: Use the available filter to locate the message
#### Step 3: Select a notification and read its complete details
#### Step 4: Open the referenced workflow or report when the message requires action
#### Step 5: Choose Print only if a physical or approved PDF record is required
#### Step 6: After resolving or recording the condition, choose the appropriate removal
After resolving or recording the condition, choose the appropriate removal action:
- **Delete** for the selected message;
- **Delete All Read** for messages already reviewed;
- **Delete All** only after confirming that every listed notification may be removed.
### Check your work
The intended notification state/count changes, while unrelated messages remain when using selected or read-only deletion.
Take a moment to check your work before closing the window. This small check can save time later.
### If something goes wrong
- Use Delete All cautiously; notification removal may not be reversible.
- If messages return, address their source workflow or scheduled process.
- Printed notifications can contain business-sensitive details.
### Related guides
- [Navigate the Muhasib Back Office](https://docs.muhasiberp.com/link/568)
- [Complete Day-End Activity Safely](https://docs.muhasiberp.com/link/204)
- [Understand Back Office Background Operations](https://docs.muhasiberp.com/link/287)
- [Request Muhasib Support](https://docs.muhasiberp.com/link/573)
### What to do next
[**Navigate the Muhasib Back Office**](https://docs.muhasiberp.com/link/568).
# Support and Troubleshooting
Check version details and collect the information needed to request Muhasib support.
# Check the Installed Muhasib Version and Database Revision
### How to Check the Installed Muhasib Version and Database Revision in Muhasib ERP
### Overview
This guide will help you collect the application and database identifiers needed for upgrade checks and support.
These values identify the running application and connected database more reliably than installer filenames or old screenshots. Designer placeholders may differ from system-generated values.
### Who can do this
You need access to Use requires the rights and business authority described by the workflow. Database, licence, user, company, or system changes require the responsible administrator.
### Before you start
Confirm the intended workstation, database, company/workspace, user or subscription context, and preserve any in-progress work before proceeding.
Before saving, check that the correct company is open and that you have permission to complete this task.
### Where to find it
Follow the launch, wizard, login, company-selection, Back Office, or power path described in the procedure; the available starting screen depends on current installation state.
### Check the Installed Muhasib Version and Database Revision
#### Step 1: In Back Office, open About
#### Step 2: Record the displayed Product Name
#### Step 3: Record Version and build information exactly as shown
#### Step 4: Record Licence Type or plan without copying private tokens/IDs
#### Step 5: Record the Database Revision
#### Step 6: Close About without changing settings
### Check your work
Make sure the values are legible and that the selected company/database is the one experiencing the issue.
Take a moment to check your work before closing the window. This small check can save time later.
### If something goes wrong
If the expected result is not shown, stop repeated attempts, check the active database/workspace/user/licence context, preserve the exact message, and follow the related recovery article.
### Related guides
- [Request Muhasib Support](https://docs.muhasiberp.com/link/573)
- [Resolve a Muhasib Startup Interruption](https://docs.muhasiberp.com/link/553)
- [Create and Verify a Manual Backup](https://docs.muhasiberp.com/link/201)
- [Version, Build, Database Revision, and Release Notes Reference](https://docs.muhasiberp.com/link/403)
### What to do next
[**Request Muhasib Support**](https://docs.muhasiberp.com/link/573).
# Request Muhasib Support
### How to Request Muhasib Support in Muhasib ERP
### Overview
This guide will help you provide enough sanitized context for Muhasib support to investigate an issue efficiently.
Muhasib advances to the next allowed lifecycle state or preserves the current state for safe diagnosis; the verification section identifies the expected result.
### Who can do this
You need access to Use requires the rights and business authority described by the workflow. Database, licence, user, company, or system changes require the responsible administrator.
### Before you start
Reproduce the issue only when safe. Do not repeat financial, inventory, tax, synchronization, restore, or licence-transfer actions merely to capture evidence.
Before saving, check that the correct company is open and that you have permission to complete this task.
### Where to find it
Follow the launch, wizard, login, company-selection, Back Office, or power path described in the procedure; the available starting screen depends on current installation state.
### Request Muhasib Support
#### Step 1: Open the supported Request Support workflow
#### Step 2: Enter a concise outcome-based subject
#### Step 3: Describe the steps, expected result, actual result, and business impact
#### Step 4: Attach only approved sanitized screenshots or logs
#### Step 5: Remove passwords, SQL connection strings, portal tokens, tax credentials, customer
Remove passwords, SQL connection strings, portal tokens, tax credentials, customer data, and payment information.
#### Step 6: Submit once and retain the resulting reference when available
### Check your work
Confirm submission or record the approved alternate support channel. Preserve the reference and avoid duplicate requests.
Take a moment to check your work before closing the window. This small check can save time later.
### If something goes wrong
If the expected result is not shown, stop repeated attempts, check the active database/workspace/user/licence context, preserve the exact message, and follow the related recovery article.
### Related guides
- [Check the Installed Muhasib Version and Database Revision](https://docs.muhasiberp.com/link/572)
- [Resolve a Muhasib Startup Interruption](https://docs.muhasiberp.com/link/553)
- [Configure Diagnostic Logging Safely](https://docs.muhasiberp.com/link/200)
- [Data Safety, Privacy, Backup, and External-Effects Reference](https://docs.muhasiberp.com/link/401)
### What to do next
[**Check the Installed Muhasib Version and Database Revision**](https://docs.muhasiberp.com/link/572).
# Sign Out and Exit
Switch company, restart Muhasib, sign out, and close the application safely.
# Switch to Another Company Workspace
### How to Switch to Another Company Workspace in Muhasib ERP
### Overview
This guide will help you leave the current company context and enter another assigned company without intentionally carrying work between them.
The source closes open child forms, records the switch, shields the workspace, opens company selection, and reloads dashboard context. Form-specific unsaved edits may not all receive the same protection.
### Who can do this
You need access to Use requires the rights and business authority described by the workflow. Database, licence, user, company, or system changes require the responsible administrator.
### Before you start
Save, complete, or explicitly cancel every open transaction and master-data form. Check that no background synchronization or critical operation is in progress.
Before saving, check that the correct company is open and that you have permission to complete this task.
### Where to find it
Follow the launch, wizard, login, company-selection, Back Office, or power path described in the procedure; the available starting screen depends on current installation state.
### Switch to Another Company Workspace
#### Step 1: Note the current company and close completed child forms
#### Step 2: Open the Back Office power options
#### Step 3: Choose Switch Company
#### Step 4: Respond to any unsaved-change prompt conservatively; cancel the switch if
Respond to any unsaved-change prompt conservatively; cancel the switch if work must be preserved.
#### Step 5: On company selection, choose the intended assigned company
#### Step 6: Wait for the workspace/dashboard to reload
#### Step 7: Confirm the new company before opening a form
### Check your work
Confirm company identity and check that newly opened lists/reports show only the expected scope.
Take a moment to check your work before closing the window. This small check can save time later.
### If something goes wrong
If the expected result is not shown, stop repeated attempts, check the active database/workspace/user/licence context, preserve the exact message, and follow the related recovery article.
### Related guides
- [Select a Company Workspace](https://docs.muhasiberp.com/link/567)
- [Navigate the Muhasib Back Office](https://docs.muhasiberp.com/link/568)
- [Sign Out and Exit Muhasib ERP Safely](https://docs.muhasiberp.com/link/576)
- [Understand Company, Location, Terminal, and Licence Identities](https://docs.muhasiberp.com/link/165)
### What to do next
[**Select a Company Workspace**](https://docs.muhasiberp.com/link/567).
# Restart Muhasib ERP Safely
### How to Restart Muhasib ERP Safely in Muhasib ERP
### Overview
This guide will help you restart Muhasib after an authorized settings, role, licence, or update change without knowingly abandoning work.
this workflow calls the Windows application restart mechanism and exits the current process. Reloading applies settings, permission, and licence state that are evaluated during startup or sign-in.
### Who can do this
You need access to Use requires the rights and business authority described by the workflow. Database, licence, user, company, or system changes require the responsible administrator.
### Before you start
Save or cancel all open work, close registers/periods only when the workflow requires it, and make sure no backup, restore, Day End, migration, or synchronization is running.
Before saving, check that the correct company is open and that you have permission to complete this task.
### Where to find it
Follow the launch, wizard, login, company-selection, Back Office, or power path described in the procedure; the available starting screen depends on current installation state.
### Restart Muhasib ERP Safely
#### Step 1: Close completed child forms
#### Step 2: Open Back Office power options
#### Step 3: Choose Restart
#### Step 4: If any form warns about unsaved work, cancel restart and
If any form warns about unsaved work, cancel restart and resolve it first.
#### Step 5: Allow the current process to exit and Muhasib to relaunch
#### Step 6: Sign in again if requested and select the correct company
### Check your work
Confirm the version, database, user, company, and intended changed behavior after relaunch.
Take a moment to check your work before closing the window. This small check can save time later.
### If something goes wrong
If the expected result is not shown, stop repeated attempts, check the active database/workspace/user/licence context, preserve the exact message, and follow the related recovery article.
### Related guides
- [Launch Muhasib ERP](https://docs.muhasiberp.com/link/552)
- [Grant and Revoke Muhasib Permissions](https://docs.muhasiberp.com/link/187)
- [Review and Maintain Muhasib Licence Access](https://docs.muhasiberp.com/link/561)
- [Sign Out and Exit Muhasib ERP Safely](https://docs.muhasiberp.com/link/576)
### What to do next
[**Launch Muhasib ERP**](https://docs.muhasiberp.com/link/552).
# Sign Out and Exit Muhasib ERP Safely
### How to Sign Out and Exit Muhasib ERP Safely in Muhasib ERP
### Overview
This guide will help you end the current Muhasib session through the supported workflow while protecting active work.
Muhasib advances to the next allowed lifecycle state or preserves the current state for safe diagnosis; the verification section identifies the expected result.
### Who can do this
You need access to Use requires the rights and business authority described by the workflow. Database, licence, user, company, or system changes require the responsible administrator.
### Before you start
Save or cancel open forms, complete required register/working-period actions, and check that backup, restore, Day End, migration, or synchronization is not running.
Before saving, check that the correct company is open and that you have permission to complete this task.
### Where to find it
Follow the launch, wizard, login, company-selection, Back Office, or power path described in the procedure; the available starting screen depends on current installation state.
### Sign Out and Exit Muhasib ERP Safely
#### Step 1: Review open forms and finish or cancel each task
#### Step 2: Open Back Office power options
#### Step 3: Choose Logout
#### Step 4: If Muhasib reports an active work period, review the warning
If Muhasib reports an active work period, review the warning and return to close required registers/periods when appropriate.
#### Step 5: At the final confirmation, proceed only when the session can safely end
#### Step 6: Wait for Muhasib to exit or return to the expected sign-in state
### Check your work
Relaunch when needed and confirm there are no unexpected open registers, locked sessions, partial records, or recovery messages.
Take a moment to check your work before closing the window. This small check can save time later.
### If something goes wrong
- Do not force-close during database writes or synchronization.
- If logout is blocked by an active period, close its POS registers through the supported workflow.
- After an abnormal shutdown, check recent transactions and application status before continuing.
### Related guides
- [End a POS Working Period](https://docs.muhasiberp.com/link/180)
- [Switch to Another Company Workspace](https://docs.muhasiberp.com/link/574)
- [Restart Muhasib ERP Safely](https://docs.muhasiberp.com/link/575)
- [Review and Maintain Muhasib Licence Access](https://docs.muhasiberp.com/link/561)
### What to do next
[**End a POS Working Period**](https://docs.muhasiberp.com/link/180).